Thursday, December 13, 2012

Medallions of Wreaths

From the archives.   I confess... I've run out of new holiday projects to post for this December.   Well, I did have two more, but the digital pictures went to cyberspace heaven and I've given the card and gifts away.   So I'd like to revive one of my favorites from last year.

-----

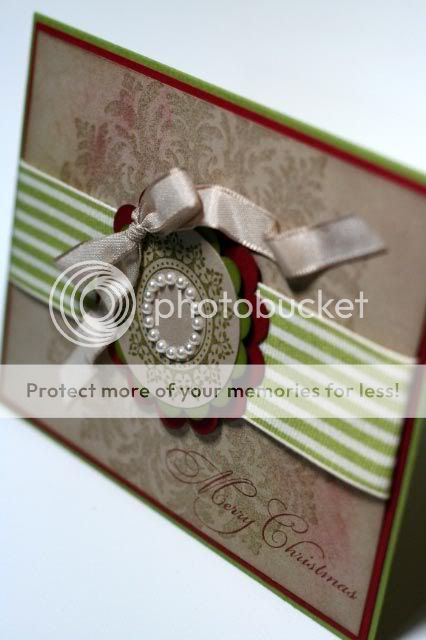
I made this card for my local Stampin' Up Demo, Chris Galbraith.   I love all of the creativity she shares with us gals all year long.  It was a pleasure to create something for her for a change.   Since the card is for my SU Demo, all of the products are Stampin Up.  


The inside has the same circle image that I used as the wreath on the front of the card stamped in clear embossing ink and then embossed with clear embossing powder.  It's very hard to see in a photo.   Note to self:  Next time I do that technique I'll have to pounce a bit of ink around it to make it stand out some more.

Supplies: 
Stamps: Stampin Up (Medallion, Vintage Labels, and All Year Cheer)
Ink: Stampin Up (Riding Hood Red, Crumb Cake, Old Olive)
Paper: Stampin' Up Cardstock
Tools: Stampin Up (Circle and Scallop Circle punches) 
Accessories: Stampin Up Ribbon (Crumb Cake Taffeta, Old Olive grosgrain stripe), Pearls

Inside of card: Stampin Up (Very Vanilla Cardstock, Riding Hood Red Classic Ink, Occasional Quotes stamp set, Vintage Labels stamp set), Versamark clear embossing ink, Clear embossing powder


Wednesday, December 12, 2012

Winter Wonder Window

I made these cards earlier this year and have been saving them to post in December.  I still love this card.  it's a clean and crisp card, but it still has layers to make things interesting.


I made these cards not long after buying the Small Madison Window die by Poppy Stamps.   I added another layer of Basic Grey cardstock at the back of the window to create a subtle shadow and additional dimension.


The wreath is from this incredibly intricate Santa & Toys die by Cottage Cutz.  And the stamped image is subtly colored using Copic markers.  The stamp image from Penny Black is actually large enough to cut two windows out of. 


Supplies: 
Stamps: Penny Black
Ink: Memento
Coloring: Copic
Paper: Stampin' Up
Tools: Poppy Stamps (Small Madison Window die), Cottage Cutz (wreath from Santa & Toys), Paper Studio (wood grain embossing folder)

Tuesday, December 11, 2012

Snowflake Ornament Card

I made these cards using some ornaments I picked up during close out at Hobby Lobby last year.  While they're cute, they're still a bit too thick to make into a card.  I built a shadow box window using the ornament punch from SU and mounted the little ornaments inside of it. 


Also a lesson learned for glittery paper.  It's hard to stick stuff to it.  I had to go back and re-do the card by adhering assembly with the ornament down using Score Tape.  That back layer is gorgeous, but the glitter is hard to work with. 


 Here's another version.


And a bit of an angled view so you can see the dimension and shadow box that frames the ornament.


Supplies: 
Paper: My Mind's Eye, Core'dinations Pearls (red and silver)
Accessories: Ribbon, Bling, Ornaments from Hobby Lobby
Tools: EK Success (corner punch), Stampin' Up (ornament punch)

Monday, December 10, 2012

Festive Holiday Lineup

Not sure if I've posted these before.  I couldn't find it in the archives, but I made these cards, with the help of my daughter back in May.   A very talented friend of mine, who's also a SU Demo, Joan Robertson from Texas hosted a little contest to name 10 sets that were retiring.  Well, I won and scored this amazing stamp set that my little 8 year old girl was all crazy over.   We immediately set to work to make these three cards.   Time to make some more.


Supplies:
Stamps: Stampin' Up (Holiday Lineup)
Paper: Stampin' Up, K& Company
Ink: Stampin' Up
Coloring:  Stampin' Up markers

Sunday, December 9, 2012

Daydream Christmas Medallion


I fell in love with Stampin' Up's Daydream Medallion stamp set and coordinating Floral Frames Framelits Dies as soon as the catalog came out last Summer.   I just knew these would be perfect for Christmas cards too.    For this medallion, I layered four of the stamps from the stamp set and another little circle stamp from a retired set called Little Pieces for the center.   

For the back layer, I cut a second medallion, sectioned it off like pieces of a pie using my Fiskars paper trimmer and then did the shadow layer application.   Add some pearls, ribbon, embossing, matting, and that's about it.   I just love the rich effect that medallion gives.   I'll have to make more of these to send out to family and friends this season. 

Below is an angled shot that shows more dimension.   The green layer is actually stamped and cut individually and then applied.   Same with the center circle.


And here's the inside of the card.  I just this gorgeous EK Success border punch that just seemed to have similar rich and elegant qualities as the medallion on the cover.


Supplies:
Stamps: Stampin' Up (Daydream Medallion, Little Pieces)
Ink: Stampin' Up
Paper: Stampin' Up card stock
Tools: Stampin' Up (Floral Frames Framelits), EK Success border punch, 1/2 inch circle punch, Cuttlebbug Embossing Folder
Accessories: Pearls, Ribbon


Saturday, December 8, 2012

Green Hot Rod Holiday


This post is also featured on the Bombshell Stamps Blog today.
____

Happy Holidays from one roaring mean hot rod. Speed Shop is my newest Bombshell Stamp set and I couldn't wait to break it in.   This big ole hunk of a hot rod winked at me and just begged to be stamped and colored.    I had good intentions of using him in a sketch, incorporating him with other accents, and just dressing him to the nines.   But that's not what he apparently wanted.  He wanted the stage to myself.   So somehow, I ended up using a Bombshell stamp in a clean and simple card... and I love it.


I carefully ran the colored image through the printed to add a greeting, added some brads and then a bit of layering.  The layers are pop dotted up from the page.   And if you look closely, there's a bit of shimmer on this beast's paint job... just the trim work.


Supplies:
Stamps: Bombshell Stamps (Speed Shop), Computer generated greeting
Ink: Memento (Tuxedo Black)
Coloring: Copic, Sakura Gelly Roll (Clear Star)
Paper: Strathmoore Bristol Smooth, Stampin' Up (Poppy Parade, Basic Black), Canson (Gold Shimmer)
Accents: Paper Studio (star brads)

Friday, December 7, 2012

Christmas Ornaments Card


My local Stampin' Up Demo, Chris Galbraith does a fantastic job.   One of the fun things she does is she puts just a little something as a thank you in my bag with my order when I pick it up.   Last month (or was it the month before) it was a sheet of Designer Series Paper from the Festival of Prints paper stack that's 6 1/2 x 4 1/2.   I had that sheet of paper sitting on my desk for a while and decided to get inspired by it to make a card.   Here's what I came up with.  I actually made three cards using that little sheet of printed paper.   Now I want to make more.   I did have that paper pad in my order that month, so I really aught to get busy. 


The colors in the print are Crumb Cake and Very Vanilla.  So I pulled those out and a red to coordinate.   I used Raspberry Ripple.   The crumb cake base is stamped with the Stampin' Up Linen background stamp (Crumb Cake ink).  The Very Vanilla layer is embossed using a Cuttlebug Embossing folder.  Add a little ribbon to the top of the die cut ornaments and then a pearl in the center medallion of the round ornament.   


The inside is kept simple.   Just a strip of DSP and I used an EK Success border punch for the small scalloped trim.


Supplies: 
Stamps: Stampin' Up (Ornament Keepsakes, Linen background)
Ink: Stampin' Up (Raspberry Ripple, Crumb Cake)
Paper: Stampin' Up (Festival of Prints DSP, cardstock)
Tools: EK Success (border punch), Stampin' Up (ornament die cuts), Cuttlebug (embossing folder)
Accessories: Stampin' Up (Ribbon), pearl

Thursday, December 6, 2012

Christmas Snow Birds

FROM THE ARCHIVES

Earlier this year, I made this Christmas card and it's certainly worth reposting.  In fact, I made several of these to send out to friends and family this year.   It's a great one for duplication. 
_______

I stumbled across SplitcoastStampers Featured Stamper challenge this week (FS290).  The challenge is to case one of the featured stamper's cards.  This week Mary (screen name jandjccc) was featured.  She has a lot of beautiful work in her gallery.  I chose to case this card CLICKY.  I did change it up a bit.   I added another mat, used a different embossing folder, used a different stamp and rounded all of the corners.


Here's a close up to show off the texture and dimension.  I just loved the white on white texture look.  it's so clean, simple, and rich at the same time.


Supplies:
Stamps: Stampin' Up (Contempo Christmas)
Paper: White Hammermill cardstock, Stampin' Up cardstock (Cherry Cobbler, Lucky Limeade)
Tools: Stampin Up (bird punch and embossing folder), Martha Stewart (sprig punch)
Accessories: Close To My Heart (charcoal colored pearl stickers), Ranger (Liquid Pearls - Ruby Red)
Related Posts Plugin for WordPress, Blogger...