Showing posts with label EK Success. Show all posts

Wednesday, February 12, 2014

Bombshell Valentine

This card is for this month's Bombshell Sketch on the Bombshell Stamps Blog.   With Valentine's day around the corner, I pulled out a classic.  She's the Bombshell Angel  wearing a gorgeous red polka dot dress cut using the Bombshell Angel Clothing Die Cut File


The printed paper is from MME's Lost and Found collection and the cardstock is from Stampin' Up.   The little circles on the front of the card are punched using a 1/2 inch EK Success Circle punch and topped with acrylic dome stickers from Stampin' Up from one of the Build-A-Brad kits. 


The Bombshell Angel is stamped on Neenah white cardstock using Memento ink (rich cocoa) and then colored with Copics.  The dress is cut using Make the Cut software and my KNK Zing e-cutter.   It's then carefully shaded using a bit of Tim Holtz/Ranger Distress Ink. 


The inside of the card is simple with a subtle print, some shading, and more of those punched circles.  


And here is Bombshell Stamp's February Sketch. Link your creation using this sketch to the Bombshell Stamp's blog for a chance to win a free stamp set. 


Tuesday, November 5, 2013

Bombshell Mojo


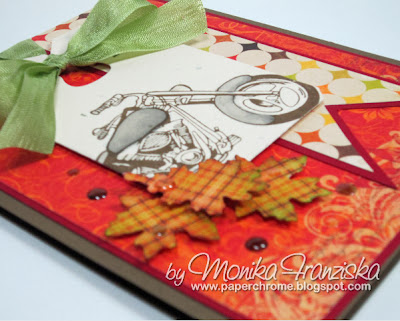
This card is a mash up of the Mojo Monday 318 sketch and this month's Bombshell Pin-Up.   Her challenge goes live on the Bombshell Blog this Wednesday.   Stop by and check out some of team's creations.   But for now.... here's my challenge combo creation.

This card features Bombshell Stamp's Harley Motorcycle stamp set.


Here's the sketch from Mojo Monday 318


A bit of an angled shot to show off the dimension.


Here's the inside of the card. 


Supplies:
Stamps: Harley Motorcycles bomb (Bombshell Stamps)
Ink: Soft Suede for the image, Kiwi Kiss and Cranberry Crisp for a bit of distressing on the punched leaves (Stampin' Up)
Coloring: alcohol markers (Copic)
Printed Paper: Apple Cider collection (BoBunny)
Cardstock: Soft Suede, Cherry Cobbler, Confetti Cream (Stampin' Up)
Tools: tag die from Chalk Talk Collection (Stampin' Up); double leaf punch (Creative Memories); border punch (EK Success)
Accents: Pear Pizazz seam binding (Stampin' Up); acrylic raindrop stickers (unknown)


Wednesday, October 16, 2013

Halloween Bombshell Mash-Up

This card is a mash up of two challenges: 1) the color challenge posed by this month's Bombshell Pin-Up, Sharon Rogers to use purple, orange, black and lime green in a card and 2) this month's Bombshell Sketch challenge. This card features Bombshell Stamp's Bombshell Angel and the coordinating Halloween Costume digital stamps.


Supplies: 
Stamps:  Bombshell Angel and coordinating Halloween Costume digital stamps (Bombshell Stamps)
Ink: Tuxedo Black (Memento): ink jet printer.
Coloring: markers (Copic)
Printed Paper: Erie (Basic Grey)
Cardstoc: Basic Black, Elegant Eggplant, Naturals White (Stampin' Up)
Accessories: lace ribbon
Tools: circle punch, scallop circle punch (EK Success)


Thursday, October 10, 2013

Custom Pizza (Treat) Box


With Halloween around the corner, it's the perfect time for treats.   So how about a pretty little box for some special treats.    Take a look at this one adorned with this gorgeous Frankenstein Bride from Bombshell Stamp's Halloween Costume digital dress up set.


And check out the treats inside.   Yum!  The box is custom sized for these little truffles. 


Here's how I made it.....


First of all, take some measurements.  I laid the candies on my cutting mat grid.   I need a box that's 2.5 x 3.5 inches.   But how tall? 


One inch tall ought to do the trick. 


Take those measurements and translate them to this basic pattern.   The orange lines indicate where the cut lines will be. The overall design is a pizza box design with the hinged flip up lid. 


After adding the various segments together for length and width, I cut my cardstock that size - 5 1/2" x 8"


The sketch above also gives me the score lines I'll need.   


Score all of the lines.


Crease all of the score lines with your bone folder. 


Make the cuts along the orange highlighted cut lines.  


Apply adhesive to the flaps to where the flaps will be on the inside of the box.   I used Score tape.


Adhere the base off the box first.  


Then finish up with the lid.


You should have a box with a snug fit.  


I like to take a piece of packaging chipboard and line the base.   My box base is 3.5 x 2.5 inches. 


Dry fit.  Trim any adjustments.  And then adhere the chipbard to the base of the box.   


Had to make sure the little candies fit just right.    :-)


Time to decorate.   Add a base layer of cardstock.   You can use part of the above sketch 


After adding the base decorative layer, I used a hole punch to notch out the lid for a finger hold.  This makes it a lot easier to open the box and get to the treats. 


See the notch?


 Finish decorating the box.   The Frankenstein Bride image from Bombshell Stamp's Halloween Costume digital dress up set is a complete digital image with the Bombshell Angel's face and is perfect to downsize.  I reduced her size to fit on my little box, printed her out, colored, and trimmed.   


Supplies: 
Coloring: markers (Copic)
Ink: dye ink (Stampin' Up - used for shading)
Printed Paper: Authentique
Cardstock: Stampin' Up
Tools: label shape and circle punch (EKSuccess)


Tuesday, July 2, 2013

Patriotic Muscle Car

Bombshell Stamps' Miss July, Michelle Giraud issued a challenge to get patriotic with red white and blue.  I combined that challenge with this week's Mojo Monday sketch (mojo300).   Here's the end result featuring the Vintage Raceway set from Bombshell Stamps.


I used a couple of star punches to add a tone on tone 3D effect on the background layer.   The below angled shot shows this a bit better. 


Love SU dimensionals.  They're so easy to use.  I also love that they are half as thick as some of the pop dots at the big box stores.   Because they're thinner I can add two layers to a card. The circle is mounted with dimensionals and so is the car.   The car has single layer dimensionals on the front which is mounted on top of the raised circle.  The back has two layers of dimensionls to raise the piece to an even level.   


Lastly, the inside of the car.  I just added some strips of paper turned into banners.   Great use for scraps. 


Here's the Mojo Monday sketch for this week - mojo300


Supplies: 
Ink: Tuxedo Black (Memento)
Coloring: markers (Copic)
Printed Paper: On the Bright Side (My Mind's Eye)
Cardstock: Riding Hood Red, Crumb Cake, Whisper White (Stampin' Up); white (Neenah)
Tools: star punches (Creative Memories and Marvy); border punch (EK Success)
Accessories: Star bling (unknown - purchased at Michael's)


Sunday, April 7, 2013

Blue Harley Spin

This card is a challenge Mash up of Bombshell Stamps Monday Muse and this week's Retro Sketch #58.   I Bombshell Stamp's Muse Monday challenge was to use what happened to be one of my favorite stamp sets - Harley Bikes.   The motorcycle stamps are just awesome.   They really capture the character and a lot of detail of the real thing.  


Here's an angled shot to show some of the detail and dimension.


The inside is mostly still blank except for a simple image of the bike. 


This is the Retro Sketch #58 that I used for inspiration. 

Supplies:
Stamps: Bombshell Stamps ( Harley Bikes)
Ink : Memento (Tuxedo Black), Stampin' Up (Midnight Muse, Cherry Cobbler)
Coloring: Copic Markers
Paper: Stampin' Up Cardstock (Sahara Sand), My Mind's Eye printed paper (On the Bright Side)
Toosls: EK Success Corner rounder, Tim Holtz embossing folder (Diamond Plate)
Accessories: Hemp twine, Misc ribbon, Stampin' Up mesh.

Monday, March 25, 2013

Orange Valentine

See how behind I am in posting.   I made these for my son to give to his class for Valentine's Day.  His favorite color is orange and I just couldn't see why he shouldn't have orange valentines to hand out. 


Supplies: 
Cardstock: Stampin' Up (Crumb Cake & Dusty Durango)
Printed Paper: My Mind's Eye
Tools: EK Success heart punch
Stamps: Stampin' Up (Teeny Tiny Wishes)
Ink: Stampin' Up. 

Sunday, January 20, 2013

Birthday King of the Road

Tuesday is my son's 11th birthday.  He'll officially be a "tween".   My young man has always had a head for cars.   I promise you, he didn't start playing as a baby until he had a car in his hand.   So when I saw that Bombshell Stamps is featuring their King of the Road stamp set each Monday of this month on the Bombshell Blog, it was a perfect fit.   What a great stamp set to use for my son's birthday card.

I stamped the antique hot rod three times using masking.   After coloring, I cut the back ground down using an exacto knife to where the cars run off of the white.   They're just roaring to go.


Here's an angled shot to show off the dimension.


And the inside of the card. 


Supplies: 
Stamps: Bombshell Stamps (King of the Road), Stampin' Up (Happiest Birthday Wishes & Circle of Friendship)
Ink: Memento (Tuxedo Black) Stampin' Up (Pumpkin' Pie)
Coloring: Copic Markers
Paper: Echo Park (A Boy's Life), SU colored cardstock, Neenah white cardstock
Tools: EK Success Border punch, Creative Memories and SU circle punches
 Accessories: adhesive nail heads

Monday, December 24, 2012

Builder's Christmas

I made this card for our work group to give to our boss.  Our manager is in the process of building his home, thus the home and tools theme. 


And the inside of the card


Supplies: 
Stamps: Stampin' Up (Christmas Punch), CTMH (Festive Thoughts - inside of card)
Ink: Memento
Paper: Echo Park, SU cardstock (Espresso, Cranberry Crisp, Crumb Cake, Marina Mist)
Tools: Martha Stewart (border punch), Stampin' Up (large oval), Ellison (tools die)
Accessories: SU (Ribbon)

Related Posts Plugin for WordPress, Blogger...