Thursday, December 27, 2012

One of a Kind Birthday

My daughter loves my SU Demo, Chris Galbraith.   When I told Angeline that I made a birthday card for Chris, Angeline was begging to make one too.  It was late last night, so we collaborated.   Here's the result.

Happy Birthday Chris!


Angeline insisted that the base and main color had to be purple.  Angeline loves to color, so I stamped a background for her to color.  Though she was very particular about how I should stamp that background. She does a great job coloring and love her ideas. 


For the greeting on the outside, Angeline insisted on the One of a Kind sentiment from the same stamp set as the background stamped image citing that "after all, Chris is one of a kind". 


And for the inside, she just loved coloring that Happy Birthday.  In fact, after she gave it back to me to mount into the card, Angeline asked to please see it again 'cause she just loved looking at it.   Followed by a detailed explanation of her coloring scheme.  Love that little girl.   :-)


And here's my guest designer.... Angeline.  The picture was taken on Christmas Day.


Supplies: 
Stamps: Stampin Up (One of a Kind, Papillion Potpourri, Outlined for Fun)
Ink/Coloring:  Stampin' Up classic die ink and markers
Paper: Stampin' Up cardstock
Tools: Stampin' Up (Butterfly Punch), Spellbinders die
Accessories: misc ribbon


Happiest Birthday

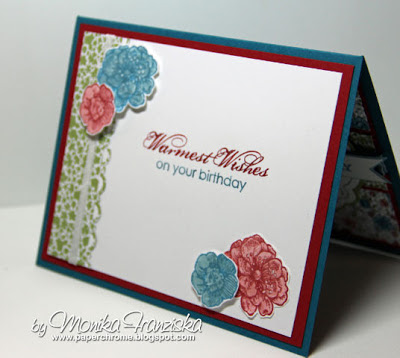
Today is my friend's birthday and she just happens to be my local SU Demo, Chris Galbraith.  I enjoy getting to make a card for her now and then, especially given all of the creative inspiration she shares with me and the rest of her customers throughout the year.  The card was inspired by this week's Pals Paper Arts sketch #PPA149.


The image is stamped and then colored with SU markers.   I used a darker color first and then a lighter one for a blended effect. The strips of printed papers are mounted on the red and then embossed. 

Here's an angled shot to show off some of the dimension and texture


And the inside of the card.  I used markers to ink up the greeting stamp.   The flowers are stamped, colored and then cut out. Adhered with some pop dots. 


Here's the sketch that provided the inspiration. Pals Paper Arts sketch #PPA149.


Supplies: 
Stamps: Stampin' Up (Apothecary Art, Everything Eleanor, and Blooming with Kindness)
Ink/Coloring: Stampin' Up (Island Indigo, Riding Hood Red, Blushing Bride, Baja Breeze)
Paper: Stampin' Up (Twitterpated DSP, and cardstock (Whisper White, Riding Hood Red, Island Indigo)
Tools: Stampin' Up (Border punch, Labels Framelits,)
Accessories: Stampin' Up (ribbon)

Monday, December 24, 2012

Builder's Christmas

I made this card for our work group to give to our boss.  Our manager is in the process of building his home, thus the home and tools theme. 


And the inside of the card


Supplies: 
Stamps: Stampin' Up (Christmas Punch), CTMH (Festive Thoughts - inside of card)
Ink: Memento
Paper: Echo Park, SU cardstock (Espresso, Cranberry Crisp, Crumb Cake, Marina Mist)
Tools: Martha Stewart (border punch), Stampin' Up (large oval), Ellison (tools die)
Accessories: SU (Ribbon)

Sunday, December 23, 2012

Christmas Chrome

How about some shiny ornaments... shiny like Chrome.   I had to do a CAS version with the ornaments I posted the other day as I just wanted them to stand out and steal the show. I'm using Bombshell Stamp's Vintage Motorcycle stamp set for these ornaments.


And as I was taking pictures, my little Ebony decided she needed to come in and inspect.  


Supplies: 
Stamps: Bombshell Stamp's (Vintage Motorcycle), Hero Arts (the greeting is cut from a background stamp)
Ink: Memento
Coloring" Copic
Tools: SU dies
Paper: SU Cardstock
Accessorites: Misc Ribbon


Three Mousy Wishes

This is for a combo challenge using Mojo Monday (mojo272) sketch and the ColourQ (cqc168) color challenge.  The sketch challenge calls for three elements in the main part of the card and this House Mouse stamp does the trick.  It works for the current House Mouse (hmfmc135) challenge as well..  Love those three mice and their bows


Here's a bit of an angled view for detail and dimension. 


And the two challenges that provided inspiration for this card. 


Supplies: 
Stamps: Stampabilities/House Mouse, Stampin' Up (Warmest Regards)
Ink: Memento
Coloring: Copic
Paper: Stampin' Up (DSP Patterns - Subtles & Cardstock
Accents: Ribbon


Saturday, December 22, 2012

Penguin Play

This is a simple but fun card using Recollections brand Washi tape, Jolee's stickers and Stampin' up cardstock with some Hammermill cover stock for the base.


Friday, December 21, 2012

A Happy Dyanmic Duos Christmas to Me!

Yay.  I got an early Christmas present this evening when I logged on to browse and saw that Dynamic Duos selected my card as one of their favorites.  Thank you Christina for picking my card.  


I just posted the card yesterday.  I almost didn't make it as yesterday was the deadline to enter.   Click here for the post or just scroll back one page.  


Thursday, December 20, 2012

Gold Medallion Christmas

I almost didn't make it.   This is for the Dynamic Duos #33 challenge this week.  Today's the last day to enter.   The color inspiration is black and gold.  At first, I wasn't sure I was going to play along.  But I needed more Chirstmas cards to send out and a little inspiration didn't hurt.  


This was a simple enough design to mass produce, but I have to say, all of the embossing did end up taking some time.   Below is the design in landscape mode and also vertical. 


Supplies: 
Stamps: Stampin' Up (Medallion, Contempo Christmas)
Ink: Versamark
Paper: Stampin' Up (cardstock), Canson (gold shimmer)
Accessories: Stampin' Up (seam binding & antique brads)

Bombshell Star Ornament - Tutorial


This month I'm the December Guest Designer, a.k.a. Pin-up for Bombshell Stamps.   As this month's guest designer, I got to come up with a challenge theme for December. Given the holidays, my challenge was to - Get Ornamental.  

For yesterday's Bombshell Pin-Up Challenge I made a star ornament featuring the Bombshell Stamped image from the Bombshell Angel and a star ornament cutting file I created.  Here's how I made it and I'd like to share the cutting files I made.  You'll also find this tutorial on the Bombshell Blog.


Cutting Files:  MTC or SVG


1. Cut two stars using the star ornament cutting file.  Link to file above.   I'll recommend a double sided print.  I used some Basic Grey (Fruitcake collection) and cut it using my KNK Zing.  I designed the star cutting file using Make the Cut software.


2.  Take one of the stars and fold up or rather curl up the four cut out points.


3. Punch out two 3/4 inch circles inch circles from scraps.   Apply some strong adhesive to one.  Score Tape works great.   And join all of the points onto the circle.   Note that I used a half inch circle to begin with, but it just didn't give me enough of a bonding surface and I then applied a larger circle later.


4. Apply adhesive to the other 3/4 inch circle and adhere to the top.  Set aside. 


5.  Take the second star.  I want the solid side visible.  So I'll fold the points to the print side as they'll be sticking out the back of the ornament for more 3D.   


6.  Fold up the cut out points with a hard crease.


7.  Flip the second star over and apply some strong adhesive to the center of the piece.  Score Tape or ATG adhesive work great.


8. Join the two stars.


9. Apply a stamped and cut out image to the front of the star.  The 3/4 inch circle is your mounting point.


10.  Apply a ribbon, string, or hanger to one off the star points and you're ready to decorate.


And here's the finished product.  Note that you can resize the cutting file and cut the stars any size you like.  


Wednesday, December 19, 2012

Bombshell December Challenge


As this month's Bombshell Pin-Up for Bombshell Stamps I got to come up with a challenge.   Come check out the Bombshell Stamps blog and let me know what you think.  Click HERE.

Tuesday, December 18, 2012

Harley Ornament Card


This is also posted on the Bombshell Blog today.   Check out their blog for some fun and snazzy ideas to use their sassy stamps. 

___

For those bikers out there, here's a card that speaks to the passion of chrome and two wheels.   I used Bombshell Stamp's Vintage Motorcycle set to create the ornaments on this card. 


Here's an angles shot to show the dimension.   the ornaments are colored using Copic markers.


And the inside of the card.  Add a stamped or computer generated greeting and another motorcycle peeking onto the card to tie it all together. 


Supplies: 
Stamps: Bombshell Stamp's (Vintage Motorcycle), CTMH (greeting)
Paper: K & Company (printed paper), cardstock, vellum
Ink: Memento (Tuxedo Black and Rhubarb Stalk)
Coloring: Copic (markers and multiliner)
Tools: Stampin' Up (dies)
Accessories: Misc ribbon.


Hope you like this card.
from Ms. December - Monika Franziska, PaperChrome


Related Posts Plugin for WordPress, Blogger...