Showing posts with label Birthday. Show all posts

Thursday, January 10, 2013

Hot Air Birthday Balloons

This card was inspired by this week's Mojo Monday challlenge (mojo275).  Yes, I know it's Thursday night, but that's how it goes for this working mom.


The balloons were stamped in two steps.   The basket and balloon were stamped separately and then I glued the cut out basket to the back of the balloon.  Remember to leave a bit of extra paper at the top of the basket for this. 


I used masking to overlap the balloons and to add the baskets on the inside of the card.    The embossed dots on the left are created by rolling the cardstock with embossing folder into the machine a smidge and then backing it back out. 


Here's this week's MojoMonday sketch


Supplies: 
Stamps: Stampin' Up (Up, Up & Away)
Ink: Stampin' Up (Melon Mambo, Daffodil Delight, Pool Party, Soft Suede), Memento (Tuxedo Black)
Cardstock: Stmapin' Up (Melon Mambo, Daffodil Delight, Pool Party)
Printed Paper: Stampin' Up (Welcome Neighbor)
Tools: Embossing Folder (Cuttlebug - Seeing Spots)
Accessories: Stampin' Up (Steam Binding - Pool Party)


Thursday, December 27, 2012

One of a Kind Birthday

My daughter loves my SU Demo, Chris Galbraith.   When I told Angeline that I made a birthday card for Chris, Angeline was begging to make one too.  It was late last night, so we collaborated.   Here's the result.

Happy Birthday Chris!


Angeline insisted that the base and main color had to be purple.  Angeline loves to color, so I stamped a background for her to color.  Though she was very particular about how I should stamp that background. She does a great job coloring and love her ideas. 


For the greeting on the outside, Angeline insisted on the One of a Kind sentiment from the same stamp set as the background stamped image citing that "after all, Chris is one of a kind". 


And for the inside, she just loved coloring that Happy Birthday.  In fact, after she gave it back to me to mount into the card, Angeline asked to please see it again 'cause she just loved looking at it.   Followed by a detailed explanation of her coloring scheme.  Love that little girl.   :-)


And here's my guest designer.... Angeline.  The picture was taken on Christmas Day.


Supplies: 
Stamps: Stampin Up (One of a Kind, Papillion Potpourri, Outlined for Fun)
Ink/Coloring:  Stampin' Up classic die ink and markers
Paper: Stampin' Up cardstock
Tools: Stampin' Up (Butterfly Punch), Spellbinders die
Accessories: misc ribbon


Happiest Birthday

Today is my friend's birthday and she just happens to be my local SU Demo, Chris Galbraith.  I enjoy getting to make a card for her now and then, especially given all of the creative inspiration she shares with me and the rest of her customers throughout the year.  The card was inspired by this week's Pals Paper Arts sketch #PPA149.


The image is stamped and then colored with SU markers.   I used a darker color first and then a lighter one for a blended effect. The strips of printed papers are mounted on the red and then embossed. 

Here's an angled shot to show off some of the dimension and texture


And the inside of the card.  I used markers to ink up the greeting stamp.   The flowers are stamped, colored and then cut out. Adhered with some pop dots. 


Here's the sketch that provided the inspiration. Pals Paper Arts sketch #PPA149.


Supplies: 
Stamps: Stampin' Up (Apothecary Art, Everything Eleanor, and Blooming with Kindness)
Ink/Coloring: Stampin' Up (Island Indigo, Riding Hood Red, Blushing Bride, Baja Breeze)
Paper: Stampin' Up (Twitterpated DSP, and cardstock (Whisper White, Riding Hood Red, Island Indigo)
Tools: Stampin' Up (Border punch, Labels Framelits,)
Accessories: Stampin' Up (ribbon)

Monday, October 15, 2012

Cheerful Monday - Birthday III

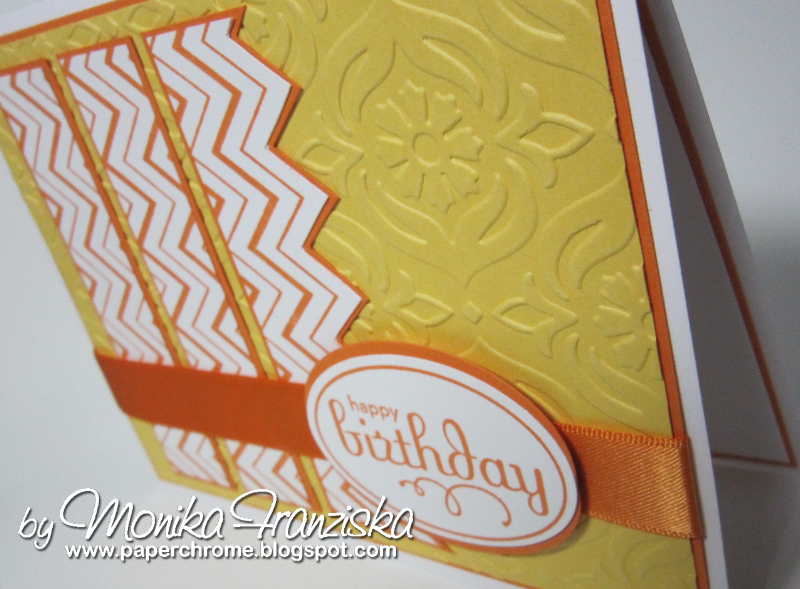
Here's my third Cheerful Monday card.   See the last two Mondays for the first two cards in this little four card collection.   .


An angled shot that shows off the dimension.  I adore embossing folders.  I'm hooked.   I think I have enough, but noooo then a new one comes out that I just have to have.   I'm beyond help.


And the inside of the card with a touch of embossing on one side.  I ran the cardstock into the machine for just an inch or so and backed it back out.  


Supply List
Stamps:  Hero Arts (Zig Zag background), Stampin' Up (Happiness Always, Perfect Punches)
Cardstock: Stampin' Up (Daffodil Delight, Pumpkin Pie, Whisper White), Hammermill Coverstock for the card base)
Ink: SU (Daffodil Delight, Pumpkin Pie, Gumball Green, Certainly Celery)
Tools: SU large oval punch, Cuttlebug embossing folder


Monday, October 8, 2012

Cheerful Monday - Birthday II

Here's a second Cheerful Monday card.   Check back to last Monday for my first and keep checking back on Mondays to see if I can manage to keep this up....  LOL.   


An angled shot so you can see the layers and dimension.   I just love adding a few layers and might need a 12 step program for pop dots (SU Dimensionals).


Inside


Supply List
Stamps:  Hero Arts (Small Open Flower, Small Closed Flower, and Zig Zag background), Stampin' Up (Perfect Punches)
Cardstock: Stampin' Up (Daffodil Delight, Pumpkin Pie, Whisper White), Hammermill Coverstock for the card base)
Ink: SU (Daffodil Delight, Pumpkin Pie)
Tools: SU large oval punch
Accessories: SU Satin Ribbon (Pumpkin Pie)

Sunday, September 30, 2012

Cheerful Monday - Birthday

A couple of weeks ago, I purchased these beautiful flower stamps during a visit to my local Archivers and I wanted to put them to use.  I was in the mood to do some crisp, clean and happy cards.  Yellow and orange seemed like a perfectly cheerful combination.  Thus I put them to work and ended up making four cards.  This is the first of four.  Call it a Cheerful Monday.  I know I need a pick me up on Mondays, so I just might do cheerful cards on Mondays as a gimmick.


Supply List
Stamps:  Hero Arts (Small Open Flower, Small Closed Flower, and Zig Zag background), Stampin' Up (Happiness Always, Perfect Punches)
Cardstock: Stampin' Up (Daffodil Delight, Pumpkin Pie, Whisper White), Hammermill Coverstock for the card base)
Ink: SU (Daffodil Delight, Pumpkin Pie, Gumball Green, Certainly Celery)
Tools: SU large oval punch


Wednesday, August 29, 2012

Happiest Birthday Flowers

Without this week's ColourQ challenge, I never would have put this combination of colors together.  And for a while there last night, I didn't think it was going to happen.   But before the night was out, I had this card designed and most of it compiled.  I finished it up this evening.


I used this week's Mojo Monday sketch for the layout.  


Here's a close up of the elements that helps show all of the layers. I made my own DSP by stamping on white and then embossed it for texture.  I had to carefully line up the pattern and run the piece of paper through a second time to cover the entire 5 1/8 x 5 1/8 piece of white.   On top of the pennants, I added the label cut out by hand.  I really wish SU would have released that shape die in the size to work with that stamp.  It's just a tease knowing that SU has a die in that shape, but it's too small.  The flowers are stamped and layered using pop dots.  The bits of ribbon are added to mimic leaves for the flowers.  I managed to adhere the label down before I stamped a greeting onto it, so I improvised and added another pennant with a greeting.  I think I like it better this way anyhooo. 


And the inside of the card.  I stamped some more of the flowers and used some craps of the pattern paper from the Twitterpated DSP for another pennant. 


These are the two challenges I used as inspiration for this card. The first is the Mojo Monday sketch and the second is the ColourQ color combination challenge. 


Supply List
Stamps: SU Everything Elanor, SU Apothecary Art (for the greeting)
Paper: SU cardstock, SU DSP (Urban Oasis, Twitterpated, Welcome Neighbor)
Inks: Stampin' Up
Markers: Sakura Clear Star Sparkle Gelly Roll pen
Tools: SU embossing folder
Accents: SU Gumball Green stitched ribbon. 
Challenges: mojo256, cQc152


Saturday, August 25, 2012

Birthday Winner

I love the ColourQ combination this week.   The turquoise and orange are just such a fun and vibrant combination. I was also determined to use the elephant in this fun new stamp set called You're Amazing from Stampin' Up.   My local demo, Chris Galbraith and I were talking about the elephant and the birthday hat.  So I just had to make use of him.   Here's the card I came up with.


I used my Copic markers to color the elephant.   I stamped the Winner tag back ground using one of the stamps in the stamp set and several masks.   The little tickets are stamped, punched and pop dotted out. 


Here you can see the dimension and all of the layers. 


Lastly, the inside of the card.   Most of the supplies used are Stampin' Up,


Here's the ColourQ inspiration for this week.  The only black I ended up using is the ink for the stamped image, but it's there.


I also used some guidance from this week's Retro Sketches challenge, though I deviated some.  I just needed more white in the card to balance it all out and reduced one of the strips. 


Supplies
Stamps: Stampin' Up (You're Amazing)
Inks/Color: Stampin' Up Inks (Tangerine Tango, Pumpkin Pie), Memento (Tuxedo Black), Copic Markers
Papers:  Stampin' Up cardstock and printed papers, Neenah cardstock for the elephant colored with Copic markers. 
Accessories: Stampin' Up ribbon, misc. brads,
Tools: Stampin' Up Embossing folder, Stampin' Up large scallop circle punch, circle cutter, EK Success tag punch,  EK Success border punch used on the inside of the card.
Challenges: rs25, cQc151


Friday, August 17, 2012

Hot Air Birthday (mojo254, cQc150)

Though I had surgery on my right hand, I;m working at becoming more adept using my left hand.  It's tricky, but I was determined to make a card last night.


The close up shows the dimension and layers.  I count 10 layers before it was all done. 

For the bit of yellow ribbon on the greeting, I didn't have that color, so I grabbed my Daffodil Delight marker and colored a piece of white ribbon.

The balloons were stamped by coloring on the stamp with SU markers and then stamping.


Here's the inside of the card,


This card was inspired by two challenges.


Supply List
Stamps: Stampin Up (You're Amazing and Afterthoughts)
Paper:  Stampin Up cardstock & printed paper (Big Top Birthday, 2010 In Color Pattern Stack)
Ink: Stampin Up
Markers: Stampin Up
Accessories: brads, Stampin Up baker's twine, Stampin' Up ribbon
Tools: Stampin Up square and scalloped square punches, Inside - EK Success border punch

Tuesday, June 5, 2012

Boy Scout Birthday for a Boy Scout Mom

My son is in Cub Scouts and one of the moms that helped organize a camp out that took place last weekend also had her birthday last weekend.  Talk about dedication.  No pedicures, no massages, no tranquil afternoon cocktail for this mom's birthday.  Instead she was roughing it in the woods, with a tent, surrounded by hyper cub scouts ready explore the wilderness.   I found out about her birthday just before everyone left for camp and stayed up to put this card together.  I had creative block too.   Hate it when that happens. 

Here's what I cam up with.  It's an oversized 8x11 card so that all the boys could sign.


Here's the inside of the card.


 Here are some close ups of the flowers.  They were made using a Stampin' Up punches and some Sizzix dies.  The cardstock is by Stampin' Up.  All of the printed papers are from K & Company from a paper pack designed for Boy Scouts.  Some of the centers are stamped with Stampin' Up stamps and sculpted with a rub-on tool.  Some have these acrylic domes from the Stampin' Up Build-A-Brad kits adhered to them.  


The greeting was stamped using Stamin' Up stamps, punched with the large SU oval punch, and layered using Spellbinder oval and scalloped oval dies.  And just about all of the embellishments were inked in one way or another.


Stampin' Up stamp sets used include (listed in order of mini pictures above): Artistic Etchings, Boho Backgrounds, Mixed Bunch, and Perfect Punches.

Sunday, April 8, 2012

Tag: Wonderfully Wonky Birthday Cake

This is for a swap on Scrapshare.  The group is to make 7 and I chose a birthday theme.   I started with this great cake die from Quickutz and it reminded me of some of Tim Burton's movies.  I used that as inspiration for the background.   I created the frame using Make the Cut (MTC) software and cut it with my KNK Zing.  This one took me a while to get done, but I love the results.  


The printed papers are from Basic Grey's Green at Heart collection.  The cake stand is made out of this glossy pearl paper that I picked up at the art department.  The black cardstock is by American Crafts.  Every single colored piece is inked with Tim Holtz / Ranger Distress Inks.  It's very subtle inking but just enough shading to give the pieces some dimension and life.


I used a lot of bling and glitter on these.  The Quickutz die has a lot of voids in great patterns.  I took advantage of those voids and either added bling or glitter.   The glittered is applied by running a backing paper through the Xyron face up and then applying very fine craft glitter. 


Here's the entire grouping.   I love this look.  I made 7 for the swap and a few extra for cards. 


The swap called for the back to be finished too.   I used a 6x6 background stamp by Impression Obsession on the back of the scrap piece from cutting the green frame on the front of the tag.   I stamped using Stampin Up's Lucky Limeade Classic Ink and sponged the outsides with the same ink. 


I couldn't resist this shot as I finally compiled all the birthday cakes.  

Related Posts Plugin for WordPress, Blogger...