Showing posts with label Distress Ink. Show all posts

Friday, July 5, 2013

Bombshell Glam


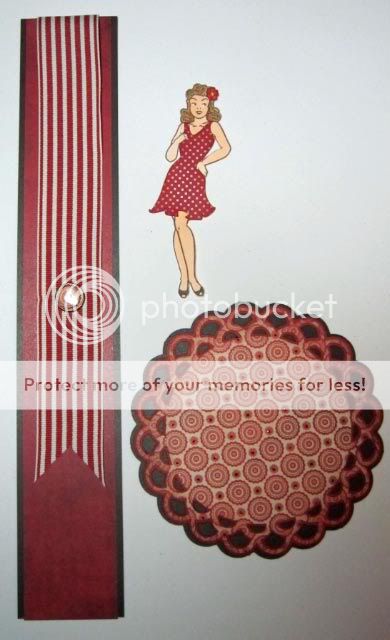
This is for the July Bombshell Sketch challenge.   I tried repeating the same scalloped circle, but it just didn't do it for me, so I used an alternate shape for the center image.   


 The rose ribbon trim is dusted with a bit of Ranger Distress ink using an artist sponge. 
Her dress is cut using MTC and my KNK Zing.  I cut one of the dresses from Bombshell Stamp's Bombshell Clothing file. 


When I saw the sketch, I saw it as a perfect opportunity to do a bit of a fancy fold


And here's the inside of the card.


Supplies:
Stamps: Bombshell Stamps (Bombshell Angel)
Ink: Memento (Rich Cocoa), Ranger Distress Ink
Coloring: Copic, Spica
Printed Paper: Stampin' Up (Pocketful of Posies)
Cardstock: Stampin' Up (Night of Navy), Core'dinations Pearls (Silver Shimmer)
Tools: Spellbinders, Martha Stewart (border punch), Make the Cut software, KNK Zing e-cutter
Accents: Stampin' Up (flower trim), Rhinestones


Wednesday, June 5, 2013

Butterfly Bombshell

This is for the Bombshell Stamps June sketch challenge.


 I adapted the sketch a bit by elongating the primary shape so that it would be more in proportion with that tall gorgeous Bombshell.   I also flipped the sketch so the line of elements is on top.  I used butterflies for that.   Instead of just adding some bling to one corner, I decided that every corner needed a little something. 


 Here's an angled shot to show some of the dimension.   I cut two of the spell binder shape -one print and one solid.  That solid piece is then cut into four pieces and aligned behind the printed piece to create a shaddow.


And the inside of the card.   


Supplies:
Stamps: Bombshell (Butterfly Queen)
Ink: Memento (Rich Cocoa), Ranger Distress Inks
Coloring: Copic
Printed Paper: Theresa Collins (Fabrications Canvas)
Cardstock: Stampin' Up
Tools: Spellbinders
Accents: Black Pearls, Nailhead brad sticker (inside of card)

Monday, March 11, 2013

Twinchie - Vintage Christmas

OMG, I found the Blogger button again.   I really needed a break from blogging and am glad to be back at it.  I missed it.   I'll be posting a few of the things I've made over the past month.  Somehow I manage to still create some items, but just haven't made it to the blogosphere.  Now I could tell you about work picking, soccer season back in full swing, or about the surgery on my hand.   Eh...  I just took a break.  No excuses. Now it's time to get back to posting.

Have you ever heard of an inchie or a twinchie?  It's a small canvas on which to create something yummy.   Well, my friend JenniferD on Scrapshare.com is hosting a swap for Twinchies.  I think she should actually call it Tirnchies since we're doing 3x3 squares.  Here's the first of my items for this swap.


I just love this Santa image by Rubber Stampede.  I walked past it several times at Hobby Lobby until I finally just snagged it and put it into my cart.   This is my first project using this stamp and all I can say is OH WOW!  It stamped wonderfully.    I used Ranger/Tim Holtz distress ink to stamp it and then embossed it with very fine clear embossing powder.  It embossed wonderfully. Every little line and dot of that image is embossed.   The image is stamped on Stampin' Up Naturals White cardstock and colored with Copic markers.   I used s bit of Spica marker for the shimmer on the rim of Santa's glasses.   To finish off the stamped image, I sponge blended on some more color using Victorian Velvet Distress Ink and then distressed the edges.   As if that wasn't enough, these adorable little brads are holding the stamped image onto a background layer. 

All of the printed paper is by My Mind's Eye, Lost and Found Christmas collection.   The background layers are also have sponge blended with distressed edges.  I hit my ribbon stash for some miscellaneous satin ribbon.  Lastly everything is mounted on yet one more layer of Stampin' Up Soft Suede cardstock.   


Here are all four Santa's lined up.  Three of these are already on their way to JeniferD.  I held back my own copy.  


This photo is a tribute to the wandering creative mind.  I wrestled with a different gorgeous paper for a few days and just couldn't get the entire ideas together.  I even ended up smooshing some bottle caps and glazing the image with Glossy Accents medium by Ranger.   But I couldn't make it further.   So that Santa in the bottle cap and three more like it are now refrigerator magnets.

Tuesday, December 4, 2012

Christmas Harley

This card is also featured on the Bombshell Stamps blog.  Check it out if you have a few minutes.  There are more pictures on the Bombshell Stamp blog including pix of the inside.
_________

This card uses the Bombshell Stamps Harley Bikes stamp set and some festive designer paper - Christmas Home from Theresa Collins.   I can just imagine Santa taking a spin on this beauty when he needs a break.


Supplies:
Stamps: Bombshell Stamps Harley Bikes
Ink: Memento and Ranger Distress Inks
Coloring: Copics
Paper: Theresa Collins - Christmas Home designer paper, Stampin' Up cardstock, Gold mirror paper from the art dept at Michael's,
Accessories: Red seam binding.

Sunday, April 8, 2012

Tag: Wonderfully Wonky Birthday Cake

This is for a swap on Scrapshare.  The group is to make 7 and I chose a birthday theme.   I started with this great cake die from Quickutz and it reminded me of some of Tim Burton's movies.  I used that as inspiration for the background.   I created the frame using Make the Cut (MTC) software and cut it with my KNK Zing.  This one took me a while to get done, but I love the results.  


The printed papers are from Basic Grey's Green at Heart collection.  The cake stand is made out of this glossy pearl paper that I picked up at the art department.  The black cardstock is by American Crafts.  Every single colored piece is inked with Tim Holtz / Ranger Distress Inks.  It's very subtle inking but just enough shading to give the pieces some dimension and life.


I used a lot of bling and glitter on these.  The Quickutz die has a lot of voids in great patterns.  I took advantage of those voids and either added bling or glitter.   The glittered is applied by running a backing paper through the Xyron face up and then applying very fine craft glitter. 


Here's the entire grouping.   I love this look.  I made 7 for the swap and a few extra for cards. 


The swap called for the back to be finished too.   I used a 6x6 background stamp by Impression Obsession on the back of the scrap piece from cutting the green frame on the front of the tag.   I stamped using Stampin Up's Lucky Limeade Classic Ink and sponged the outsides with the same ink. 


I couldn't resist this shot as I finally compiled all the birthday cakes.  

Monday, February 20, 2012

Swap Set: Lucious Retro Red


I signed up for a swap on Scrapshare.com.   One of my online friends, JenniferD, is hostessing this swap.  I love her work and just couldn't resist signing up for a few groups.   The swap is for elements to be used on a scrapbook page (or two page spread).  This group's theme is RED.   I used a card I made a few weeks back as inspiration (link).   


The gal is stamped using a stamp from the Bombshell Angel from Bombshell Stamps.  I stamped it in Memento Rich Cocoa and colored her with Copic markers.   The dress she's wearing is from a cutting file that I purchased from Bombshell Stamps and cut using Make the Cut (MTC) software and my KNK Zing.   I added some shading to the dress using Ragner/Tim Holtz Distress Inks before adhering the dress to the cut out stamped image.

The border is made using papers from My Mind's Eye (Lost & Found collection).   The ribbon is from Stampin' Up and the brad is also from Stampin' Up.  It's a Build-A-Brad that are discontinued.   The Build-A-Brad has a half inch punched image from one of the paper patterns in the MME collection under the acrylic dome. 

The medallion (for lack of a better term) was created with MTC software by joining a lot of circles very carefully, welding it to a larger circle, replicating and re-welding to each other to make sure that the image is symmetrical.  I then added a couple of shadow layers with a black out of any open spaces on the last shadow layer.   Lasly, I distressed the edges of all of the layers using Ranger/Tim Holtz Distress Ink before adhering the layers together.   The paper used is all from MME - Lost & Found collection.   The paper has small glitter accents that add just the right touch of bling.

Wednesday, December 21, 2011

Toy Soldier Christmas Salute

This has to be one of my favorites this year.  Sadly it's one of a kind and went to my aunt in Ft. Lauderdale.   She enjoys art and I know she'll appreciate what went into making this little gem. 


Supplies:
Stamps: Recollections (Nutcracker)
Ink: Memento (stamped image), Tim Holtz Distress Inks (shading)
Coloring: Copic Markers
Paper: K&Company (designer printed paper), Core'dinations (shimmering cardstock), Hammermill white coverstock (for stamped image)
Tools: Sizzix (embossing folder)
Accessories: Misc Ribbon, Paper Studio (snowflake brad)

Saturday, December 17, 2011

Pink Snowstorm

How about a little pink for Christmas?   It all started when I was playing with my new KNK Zing electronic cutter using Make the Cut (MTC) software.   The snowflake is one of the stock images in MTC.  I just added a shadow, and sent it to my new cutter.  Wow.  The cutter just rocked! This was thick shimmer paper by Core'dinations and the machine took it on without any issues.   The snowflake was the motivation for the rest of the card.  


Supplies: 
Paper: K&Company (printed paper), Core'dinations (White, red, and pink shimmer paper)
Ink: Tim Holtz Distress Ink
Toos: KNK Zing (snowflake), Sizzix (snowflake embossing die and "joy" die)
Accessories: Ribbon, Button
Related Posts Plugin for WordPress, Blogger...