Showing posts with label Basic Grey. Show all posts

Wednesday, October 16, 2013

Halloween Bombshell Mash-Up

This card is a mash up of two challenges: 1) the color challenge posed by this month's Bombshell Pin-Up, Sharon Rogers to use purple, orange, black and lime green in a card and 2) this month's Bombshell Sketch challenge. This card features Bombshell Stamp's Bombshell Angel and the coordinating Halloween Costume digital stamps.


Supplies: 
Stamps:  Bombshell Angel and coordinating Halloween Costume digital stamps (Bombshell Stamps)
Ink: Tuxedo Black (Memento): ink jet printer.
Coloring: markers (Copic)
Printed Paper: Erie (Basic Grey)
Cardstoc: Basic Black, Elegant Eggplant, Naturals White (Stampin' Up)
Accessories: lace ribbon
Tools: circle punch, scallop circle punch (EK Success)


Tuesday, May 28, 2013

Live to Ride

Welcome to the May Bombshell Hump Day Blog Hop.   The theme is banners, so I had to pull out my seam binding and make my favorite little banner.   

It's also Motorcycle Safety Month.  This card is a call out to all drivers to look twice and don't just look for cars.  Keep an eye out for motorcycles too. Share the road and help us all ride safe.


BLOG ROLL


Supplies: 
Stamps: Live to Ride (Bombshell Stamps)
Ink: Basic Black craft ink/pigment ink (Stampin' Up)
Coloring: pencils (Prismacolor)
Printed Paper: Gypsy (Basic Grey); Miss Caroline (My Mind's Eye)
Cardstock: Basic Black (Stampin' Up); white (Hammermill)
Accessories: black embossing powder; baker's twine; seam binding (Stampin' Up)

Thursday, December 20, 2012

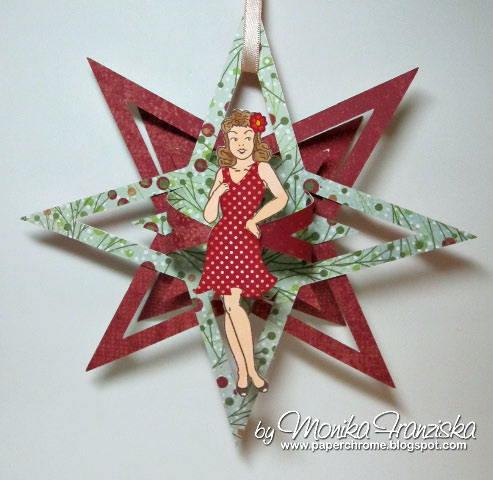
Bombshell Star Ornament - Tutorial


This month I'm the December Guest Designer, a.k.a. Pin-up for Bombshell Stamps.   As this month's guest designer, I got to come up with a challenge theme for December. Given the holidays, my challenge was to - Get Ornamental.  

For yesterday's Bombshell Pin-Up Challenge I made a star ornament featuring the Bombshell Stamped image from the Bombshell Angel and a star ornament cutting file I created.  Here's how I made it and I'd like to share the cutting files I made.  You'll also find this tutorial on the Bombshell Blog.


Cutting Files:  MTC or SVG


1. Cut two stars using the star ornament cutting file.  Link to file above.   I'll recommend a double sided print.  I used some Basic Grey (Fruitcake collection) and cut it using my KNK Zing.  I designed the star cutting file using Make the Cut software.


2.  Take one of the stars and fold up or rather curl up the four cut out points.


3. Punch out two 3/4 inch circles inch circles from scraps.   Apply some strong adhesive to one.  Score Tape works great.   And join all of the points onto the circle.   Note that I used a half inch circle to begin with, but it just didn't give me enough of a bonding surface and I then applied a larger circle later.


4. Apply adhesive to the other 3/4 inch circle and adhere to the top.  Set aside. 


5.  Take the second star.  I want the solid side visible.  So I'll fold the points to the print side as they'll be sticking out the back of the ornament for more 3D.   


6.  Fold up the cut out points with a hard crease.


7.  Flip the second star over and apply some strong adhesive to the center of the piece.  Score Tape or ATG adhesive work great.


8. Join the two stars.


9. Apply a stamped and cut out image to the front of the star.  The 3/4 inch circle is your mounting point.


10.  Apply a ribbon, string, or hanger to one off the star points and you're ready to decorate.


And here's the finished product.  Note that you can resize the cutting file and cut the stars any size you like.  


Thursday, October 25, 2012

Clean Halloween


Just a clean and simple Halloween card


Supplies:
Stamps: Stampabilities
Paper: Basic Grey (thin run of striped paper), misc. cardstock
Coloring: Spica markers
Tools: Paper Studio (star emossing folder), EK Success (star border punch)

Sunday, October 14, 2012

Wicked Collaboration


Halloween is around the corner.   The kids and I just went to the pumpkin patch this afternoon and picked out a pumpkin to carve.   Here's a card my daughter and I made for her teacher last year.  


Supplies: 
Stamps: greeting and cat from Close to My Heart, pumpkin from Basic Grey, 
Ink: Stampin Up
Paper: K& Company, misc purple glitter.
Tools: Martha Stewart border punch, Spellbinder, Ribbon


Thursday, October 4, 2012

Witches Trick or Treat

It's October and Hallween is just around the bend.  So it's time to post some Halloween cards.


Supplies
Stamps: Stampabilities (the witches legs), Stampin' Up (Holiday Best), Spider and web inside of card - misc acrylic stamps, perhaps Inkadinkadoo
Ink/Coloring: Stapin' Up Classic Ink, Copic markers, Spica Markers
Papers: Baseic Grey, K & Co.
Tools: EK Success (border punch), Cuttlebug (embossing folder), Stampin' Up (oval and scalloped oval punches, Martha Stewart (bird punch, inside of card)
Accessories: Ribbon (unknown brand)


Tuesday, October 2, 2012

Bomb Away the Blues

It's a rainy day around these parts and what better way to bomb away the blues than with an awesome Bombshell project.   I used my Bombshell Angel stamp, this months sketch challenge from Bombshell Stamps blog.  There's so much detail to this card, I just had to make the image a bit larger than I usually do.


The background is this great two sided print from Echo Park.  I thought of my Bombshell Angel stamp the moment I saw that paper in the store.  It used to be a crisp black and white.   I took a Spellbinder Embossing folder and some SU Going Grey classic ink to it.  I shaded the paper before embossing and then did another round of shading/distressing after running it through the embossing folder.    The blue paper is a print from Creative Memories that's got a few years on it, but I'm good with "vintage" paper if you will.  I love it all. The accents are some Basic Grey ribbon and a line of brads.

Now to the main image herself.   She's my Bombshell Angel from Bombshell Stamps.  I stamped her using Memento Ink (Rich Cocoa) and then colored her using my Copic markers.  I dressed her up like a paper doll using this coordinating cutting file from Bombshell Stamps. I cut the dress using Make The Cut software and my KNK Zing.  I shaded the blue dress (and the blue used for the mats) with some SU Classic ink.


And here's the inside of the card.  I ran a piece of white cardstock into the die cut machine but only an inch or less and rolled it back out.   I added some shading around the edges and a few scraps of printed paper (also shaded).  Viola... done!


Here's the card sketch used from the Bombshell Stamps forum.


Supplies: 
Stamps: Bombshell Stamps (Bombshell Angel)
Ink: Memento (Rich Cocoa), Stampin' Up (Basic Grey, Brocade Blue)
Coloring: Copic markers
Papers: Echo Park print, Creative Memories print, Nennah (for the Bombshell Angel image), Hammermill coverstock (for the inside of the card), Stampin Up (Basic Black for the card base)
Tools: Spellbinder embossing folder
Accents: Basic Grey Ribbon, Paper Studio brads, Stampin' Up Dimensionals

Product Highlights.... 

Bombshell Angel stamp set


Bombshell Angel cutting file 


Thursday, August 23, 2012

Friendly Monster Birthday

Here's my card using this week's Mojo Monday sketch.  I stamped and colored the little monster image some time ago using my Copic markers.   I can't color right now as my hand is still heeling from surgery, so it's a perfect time to put this little one to use.  Oh and I have to add that the colors are for my 8 year old daughter.   It's a bit busy for me, but she thinks it's wonderful.  :-)


Supplies
Stamps: Close to My Heart (Party Animal), Stampin Up (Vintage Labels)
Paper: Basic Grey (Lime Rickey), Stampin' Up card stock
Tools: Spellbinders, Stampin' Up punches, Fiskars border punch
Coloring: Copic Markers, Memento Ink, Stampin Up inks.

Monday, August 6, 2012

Bag Tags

Today is the first day of school for my little ones.  Each year I make a luggage tag/bag tag for their backpacks.  I try to coordinate with the pack.  On one side is their name and on the other side is their contact info.  I use these great plastic Bag Tag laminating sleeves by Scotch.


And here's a picture of my 3rd and 5th grader.   Time is flying by.


Here they are with their new backpacks loaded down with school supplies. It's crazy how much we have to send in.   We couldn't even fit it all in those large backpacks.  They each had to carry in another bag of supplies.  


Supplies: 
Angeline's Bag Tag: Basic Grey (Green at Heart)
Spencer's Bag Tag: 7 Gypsies printed paper (Venice 6x6)
Both Tags:  Stampin' Up ink (for distressing), Stampin' Up Cardstock (middle layer), Recollections silver sparkly paper, Make the Cut (to design the cutting file - their names) and KNK Zing to cut, EK Success corner rounder

Thursday, June 7, 2012

Congrats Graduate


Here's a graduation card as we know lots of poeple are graduating right now including my hubby who got is bachelor's degree later in life.


I made the little owls first using the Stampin' Up owl punch and pieced a graduation hat together from cuts of a hexagon punch and the remnants of a heart punch.   The cardstock is all Stampin' Up.  The prints on the owls are by Lily Bee Desing.  I picked up a small 6x6 pad that had small scale prints. The rest of the printed papers are Basic Grey (Oxford).  The greeting stamp is from Stampin' Up (All Year Cheer) and so are the punches.   The border punch is the pinking hearts punch that both Stampin' Up and EK Success sell.   Inside the card si a bit of Stampin' Up ribbon.


Sunday, April 8, 2012

Tag: Wonderfully Wonky Birthday Cake

This is for a swap on Scrapshare.  The group is to make 7 and I chose a birthday theme.   I started with this great cake die from Quickutz and it reminded me of some of Tim Burton's movies.  I used that as inspiration for the background.   I created the frame using Make the Cut (MTC) software and cut it with my KNK Zing.  This one took me a while to get done, but I love the results.  


The printed papers are from Basic Grey's Green at Heart collection.  The cake stand is made out of this glossy pearl paper that I picked up at the art department.  The black cardstock is by American Crafts.  Every single colored piece is inked with Tim Holtz / Ranger Distress Inks.  It's very subtle inking but just enough shading to give the pieces some dimension and life.


I used a lot of bling and glitter on these.  The Quickutz die has a lot of voids in great patterns.  I took advantage of those voids and either added bling or glitter.   The glittered is applied by running a backing paper through the Xyron face up and then applying very fine craft glitter. 


Here's the entire grouping.   I love this look.  I made 7 for the swap and a few extra for cards. 


The swap called for the back to be finished too.   I used a 6x6 background stamp by Impression Obsession on the back of the scrap piece from cutting the green frame on the front of the tag.   I stamped using Stampin Up's Lucky Limeade Classic Ink and sponged the outsides with the same ink. 


I couldn't resist this shot as I finally compiled all the birthday cakes.  

Related Posts Plugin for WordPress, Blogger...