Showing posts with label Paper Studio. Show all posts

Monday, October 28, 2013

You Can Do It

I just had to play with this newly released digital stamp set from Bombshell Stamps - Rosie the Riveter.   It's taking a break from Fall and Halloween colors and stepping back to a patriotic color theme, which suits Rosie just fine.


Suppliers: 
Ink: distress ink (Ranger/Tim Holtz)
Printed Paper: BoBunny. 
Cardstock: Poppy Parade (Stampin' Up), blue (Creative Memories)
Tools: embossing folder (PaperStudio), circle cutter
Coloring: markers (Copic)

Sunday, May 5, 2013

Hot Wishes


It's time for Bombshell Stamp's May sketch challenge.   


I ended up turning the bottom half of the sketch into a fancy fold. 


And here's the inside of the card.


BombShell Stamp's may sketch challenge.


using Piston Rebel stamp set


Additional Supplies
Ink: Tuxedo Black (Memento)
Coloring: markers (Copic)
Printed Paper: (Authentique)
Cardstock: Night of Navy, Poppy Parade, Pumpkin Pie, Naturals White for the inside (Stampin' Up), white for stamping and coloring (Neenah)
Tools: stars embossing folder (Paper Studio)
Accessories: rubon greeting (K&Company)

Wednesday, December 12, 2012

Winter Wonder Window

I made these cards earlier this year and have been saving them to post in December.  I still love this card.  it's a clean and crisp card, but it still has layers to make things interesting.


I made these cards not long after buying the Small Madison Window die by Poppy Stamps.   I added another layer of Basic Grey cardstock at the back of the window to create a subtle shadow and additional dimension.


The wreath is from this incredibly intricate Santa & Toys die by Cottage Cutz.  And the stamped image is subtly colored using Copic markers.  The stamp image from Penny Black is actually large enough to cut two windows out of. 


Supplies: 
Stamps: Penny Black
Ink: Memento
Coloring: Copic
Paper: Stampin' Up
Tools: Poppy Stamps (Small Madison Window die), Cottage Cutz (wreath from Santa & Toys), Paper Studio (wood grain embossing folder)

Saturday, December 8, 2012

Green Hot Rod Holiday


This post is also featured on the Bombshell Stamps Blog today.
____

Happy Holidays from one roaring mean hot rod. Speed Shop is my newest Bombshell Stamp set and I couldn't wait to break it in.   This big ole hunk of a hot rod winked at me and just begged to be stamped and colored.    I had good intentions of using him in a sketch, incorporating him with other accents, and just dressing him to the nines.   But that's not what he apparently wanted.  He wanted the stage to myself.   So somehow, I ended up using a Bombshell stamp in a clean and simple card... and I love it.


I carefully ran the colored image through the printed to add a greeting, added some brads and then a bit of layering.  The layers are pop dotted up from the page.   And if you look closely, there's a bit of shimmer on this beast's paint job... just the trim work.


Supplies:
Stamps: Bombshell Stamps (Speed Shop), Computer generated greeting
Ink: Memento (Tuxedo Black)
Coloring: Copic, Sakura Gelly Roll (Clear Star)
Paper: Strathmoore Bristol Smooth, Stampin' Up (Poppy Parade, Basic Black), Canson (Gold Shimmer)
Accents: Paper Studio (star brads)

Thursday, October 25, 2012

Clean Halloween


Just a clean and simple Halloween card


Supplies:
Stamps: Stampabilities
Paper: Basic Grey (thin run of striped paper), misc. cardstock
Coloring: Spica markers
Tools: Paper Studio (star emossing folder), EK Success (star border punch)

Thursday, October 18, 2012

Halloween Ride

I just love these motorcycle stamps by Bombshell Stamps.   I decided to challenge myself to make a Halloween card and this is what I came up with.  The motorcycle stamp from Bombshesll Stamp's set called Custom Choppers is just such a fun image to use.  It just wants to roll right off of the page/card.


I stamped the image on some speckled cardstock from Stampin' Up.   I then cut it down to size and used a ruler with an Exacto knife and freestyle trimming with an Exacto knife to make the image of the bike just roll off of the white base. 


Both the front and the back of the bike are slightly off of the white stamped layer. 


And here's the inside of the card.   The Happy Halloween banner on the front of the card ended up getting covered up, so I added another strip on the inside of the card. 


ETA: and it just so happens that this card is perfect for this week's Dynamic Duos challenge. I had to add it to the dynamic duos challenge blog.   Love the ladies there and it's one of my favorite challenge blogs.


Supplies
Stamps: Bombshell Stamps (Custom Choppers)
Paper: My Mind's Eye (Mischievous, 6x6 pack), Stampin' Up Cardstock (Pumpkin Pie, Basic Black, & Confetti)
Ink: Memento
Coloring: Copic Markers
Accents: Paper Studio star brads

Tuesday, October 2, 2012

Bomb Away the Blues

It's a rainy day around these parts and what better way to bomb away the blues than with an awesome Bombshell project.   I used my Bombshell Angel stamp, this months sketch challenge from Bombshell Stamps blog.  There's so much detail to this card, I just had to make the image a bit larger than I usually do.


The background is this great two sided print from Echo Park.  I thought of my Bombshell Angel stamp the moment I saw that paper in the store.  It used to be a crisp black and white.   I took a Spellbinder Embossing folder and some SU Going Grey classic ink to it.  I shaded the paper before embossing and then did another round of shading/distressing after running it through the embossing folder.    The blue paper is a print from Creative Memories that's got a few years on it, but I'm good with "vintage" paper if you will.  I love it all. The accents are some Basic Grey ribbon and a line of brads.

Now to the main image herself.   She's my Bombshell Angel from Bombshell Stamps.  I stamped her using Memento Ink (Rich Cocoa) and then colored her using my Copic markers.  I dressed her up like a paper doll using this coordinating cutting file from Bombshell Stamps. I cut the dress using Make The Cut software and my KNK Zing.  I shaded the blue dress (and the blue used for the mats) with some SU Classic ink.


And here's the inside of the card.  I ran a piece of white cardstock into the die cut machine but only an inch or less and rolled it back out.   I added some shading around the edges and a few scraps of printed paper (also shaded).  Viola... done!


Here's the card sketch used from the Bombshell Stamps forum.


Supplies: 
Stamps: Bombshell Stamps (Bombshell Angel)
Ink: Memento (Rich Cocoa), Stampin' Up (Basic Grey, Brocade Blue)
Coloring: Copic markers
Papers: Echo Park print, Creative Memories print, Nennah (for the Bombshell Angel image), Hammermill coverstock (for the inside of the card), Stampin Up (Basic Black for the card base)
Tools: Spellbinder embossing folder
Accents: Basic Grey Ribbon, Paper Studio brads, Stampin' Up Dimensionals

Product Highlights.... 

Bombshell Angel stamp set


Bombshell Angel cutting file 


Friday, January 27, 2012

Angry Bird Thank Yous

After making the bottle cap magnets in yesterday's post, I had a bunch of little one inch circles left over with Angry Bird faces.  What to do?   Well, we're going to need thank you cards.   So this is what I came up with. 


The cards are quite simple.   The yellow card base is made with Bazzill cardstock.  I used misc cardstock for the "Thank You", probably Paper Studio from Hobby Lobby.   The "Thank You!" was created using Make The Cut (MTC) software and cut it with my KNK Zing.   The Angry Bird face in the You was also done with MTC and my Zing.   It's a print and cut file.   The "o" is popped up using a Stampin' Up dimensional.


Thursday, January 26, 2012

Angry Bird Birthday Invites


My son just turned 10.  What a milestone.   Each year as my son's birthday approaches, he gets to decide if he wants to have a party or get some large presents from mom and dad.   This year, he chose to have a party.   Well, lesson learned for Mom, I need 6 weeks of planning time for a party and not just three or four.   Thus, my son's birthday party is going to take place two weeks after his birthday.   Sigh.   

Alas, it's going to be a good one.   We're doing commando training and the party theme will be Angry Birds.   Well, there aren't a lot of Angry bird party theme items on the market yet so we're left to our own devices.   I'll share more of what we came up with in the coming days.  For now, here's the invitation that we sent out.  


Here's a picture of the army of invitations lined up on my desk as I was making them. 


The cards are made just using cardstock (mostly from Hobby Lobby - Paper Studio).   The faces are paper pieced.   I used Make the Cut (MTC) software to create a file for my KNK Zing electronic cutter. 

Saturday, December 24, 2011

Golfer's Christmas Gift

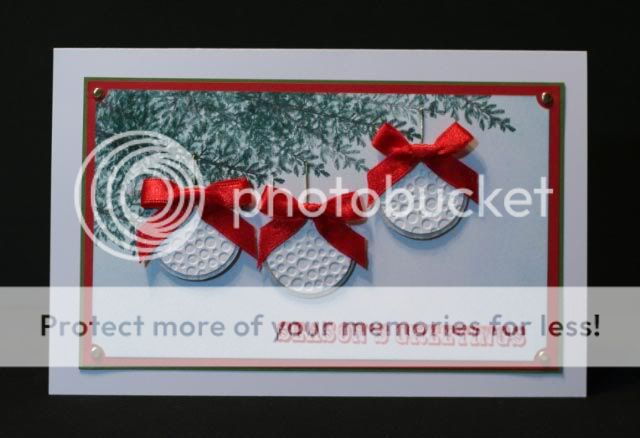
I changed job's this year and my new boss is a golfer.  The idea of these ornaments stared out as a joke idea, but then.... what the heck.  He can think of us year over year as he puts golf balls into a tree.   After all, I understand that golfers often put golf balls into trees.  Right? 

P.S. He also got a gift card to a golfer's pro shop.   


Supplies For Card:  
Stamps:  Stampin' Up (Lovely as a Tree), Hero Arts (Greeting - backgroudn stamp cut apart)
Ink: Stampin' Up
Cardstock:  Hammermill Coverstock, Misc Red and Green cardstock from Hobby Lobby, Creative Memories Silver Shimmer paper
Toos: Cuttlebug embossing folder, EK Success circle punch, Creative Memories circle punch, Stampin' Up tag corner punch
Accessories: Paper Studio gold brads, Misc. red ribbon
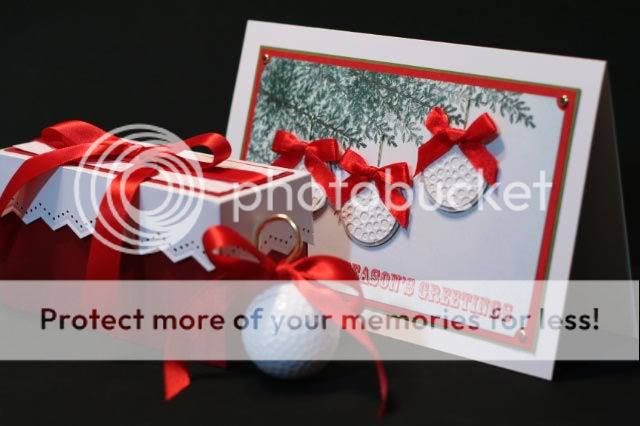
Supplies for Box: 
Cardstock: Bazzil (red), Hammermill (white coverstock)
Tools: Paper trimmer, Score Pal, Martha Stewart border punch, Cuttlebug embossing folder
Accessories: Ribbon

Golf Ornament: 
Golf ball, gold hooks with screw in, ribbon


Wednesday, December 21, 2011

Toy Soldier Christmas Salute

This has to be one of my favorites this year.  Sadly it's one of a kind and went to my aunt in Ft. Lauderdale.   She enjoys art and I know she'll appreciate what went into making this little gem. 


Supplies:
Stamps: Recollections (Nutcracker)
Ink: Memento (stamped image), Tim Holtz Distress Inks (shading)
Coloring: Copic Markers
Paper: K&Company (designer printed paper), Core'dinations (shimmering cardstock), Hammermill white coverstock (for stamped image)
Tools: Sizzix (embossing folder)
Accessories: Misc Ribbon, Paper Studio (snowflake brad)

Tuesday, December 13, 2011

Scroll of a Tree


Supplies: 
Paper: PaperStudio, Misc Cardstock
Stamps: Stampabilities
Inks: Gold pigment ink, Colorbox Liquid Chalk
Tools Spellbinder Dies
Misc: Ribbon, Bling, Gold Embossing powder

Wednesday, December 7, 2011

Wonderful Snowflake Medley


Supplies: 
Stamps: Acrylic stamps - may be Inkadinkadoo, but not sure
Ink/Coloring: Memento Tuxedo Black, Colorbox Liquid Chalk, Copic Markers
Paper: Paper Studio, gold mirrored cardstock from the art dept.
Tools: Stamin Up Top Notes die, Martha Steward snowflake punch, Paper Shapers layered snowflake punch, Fiskars snowflake punch
Accessories: Ribbon, Gold adhesive beads

Tuesday, December 6, 2011

Ornamental Dove


Supplies:
Stamps: Paper Studio
Ink: Stampin Up Craft Ink, Colorbox liquid chalk
Paper: Paper Studio; Misc Cream Cardstock, Gold mirrored cardstock from the art department
Tools: Stampin Up Ornament Punch
Accessories: Gold thread, clear embossing powder, red felt ribbon.

Friday, December 2, 2011

Christmas Ornament Cards

These are some cards that I multiples of.


Here's another version of the above card.


Supplies: 
Stamps: Stampin Up (Tags til Christmas)
Paper: Paper Studio, Gold paper from the art department
Tools: Martha Steward Border punch, Stampin Up Ornament Punch, Spellbinder dies
Ink: Colorbox Liquid Chalk Ink, Gold pigment ink
Accessories: Gold embossing powder, Stampin Up Elasti-cord, Bling


Related Posts Plugin for WordPress, Blogger...