Saturday, December 28, 2013

Happy Bombshell New Year

Hope you have some fabulous celebrations planned to bring in the new year.    This Bombshell gal sure does.   She's ready to party Vegas Showgirl style.   The image is from Bombshell Stamps Butterfly Queen.  The card is a mash up of two challenges Retro Sketches (rs95) and ColourQ (cQc221) challenges.


The Bombshell image is stamped using Memento Ink in in Rich Cocoa and colored with Copic Markers and accented with a Sakura clear Stardust Gel pen.


Here's an angled view to see some of the dimension.   The Bombshell and the main layer of the cards is pop dotted up using SU dimensionals.

And lastly, the inside of the card.   It's simple and mimics the front of the card.


Friday, December 27, 2013

Santa's Harley

It's after Christmas.  Santa's made his world wide dash to deliver presents.  Now it's time for his break.   I can't think of a better way to relax than to take a spin on two wheels.  So here's one more holiday card featuring Bombshell Stamps' Vintage Motorcycle


Here's an angled shot to show some of the dimension.   There are two pop up layers.


And the inside of the card.


Supplies: 
Ink: Memento (Tuxedo Black)
Coloring: Copic markers
Patterned Paper: My Mind's Eye
Cardstock: Neenah (white), Stampin' Up (Cherry Cobbler, Always Artichoke, and Naturals White)
Accessories: Stamin' Up ribbon
Tools: Martha Steward border punch (used on the inside)

.

Monday, December 16, 2013

Merry Muscle Car Wishes

This card is also posted on Bombshell Stamps' Muse Monday post today.  I got inspiration from two challenges: Retro Sketch 94 and Dynamic Duos 83. The card features Bombshell Stamps' Speed Shop Stamp set.  The car is stamped with Memento Tuxedo Black ink and colored with Copic markers. 


I wrapped pieces of ribbon onto a scrap of cardstock for the blue chevron accent.   The ribbon is from Stampin' Up in Marina Mist.  The background is embossed using Stampin' Up's Arglye embossing folder


 Printed papers are by Stampin' Up and SEI.   The cardstock is Stampin' Up Crumb Cake.  The greeting is from SU's retired Lots of Thoughts set.


And the inside of the card. 


  Here's the sketch and color challenge inspiration.


Saturday, December 14, 2013

Holiday Party Bombshell

I haven't been posting for a few weeks as I went out for carpal tunnel surgery.  I'm still heeling, but still functioning with my right hand while coddling my left hand.   So I made a clean and simple card to keep things easier.   I really like CAS cards and often aspire to make CAS cards, but don't always achieve that aspiration.  Hopefully I did this time.    So here she is.... my Holiday Bombshell.


This Bombshell Angel is stamped with Rich Cocoa Memento ink and colored with Copics.   The dress is cut using my e-cutter with MTC software using the Bombshell Clothing digital die cut file. 


The Bombshell's Santa hat is from the Bombshell Stamps Holiday Accessory set.  It's stamped, the red is colored with Copics and the fuzzy white stuff is this great medium called Liquid Applique that puffs up when heated with a heat gun. 


The designer printed papers are from My Mind's Eye and Recollections.   The silver layer is Canson and the white cardstock is Neenah with a Hammermill white cardstock card base.   Some dimensional foam tape is used to pop up this gorgeous gal from the card base.   Lastly, the embossing is created using an embossing folder by Darice.   

Sunday, December 1, 2013

Merry Scenic Winter Wishes


This card is for this week's Color Throwdown (CTD270) and Paper Players (PP174) challenges.  I actually stamped and colored the main image some time ago.   Since I'm recovering from carpal tunnel surgery, it prompted me to dig through my stash of predone elements and work with those.  This image was a perfect fit for both challenges.   


Here are a couple of angled shots.


and the inside of the card.


Supplies:
Stamps: winter scene (Hero Arts); background (Impression Obsession)
Ink: Tuxedo Black (Memento); embossing ink (Versamark)
Coloring: markers (Copic); Gumball Green Marker (Stampin' Up)
Cardstock: Crumb Cake,  Gumball Green (Stampin' Up); silver (Core'dinations); silver (Canson); white (Neenah)
Ribbon: Gumball Green stitched, silver (Stampin' Up)
Tools: oval and scallopped oval punches (Stampin' Up)
Other: silver embossing powder


Saturday, November 30, 2013

Surgery is No Fun

I had carpal tunnel surgery on my left hand on Tuesday.   It was actually round two on that hand due to scar tissue.   My right hand is still functional though.   I'm off from work for a few weeks.   That"s a mixed blessing.  While it gives my hand a chance to recover, I'm the kind of person that likes to stay busy with something.   I suspect I'll discover how good of a one handed card maker I am.  

Friday, November 8, 2013

Custom Notecard Holder


The gift giving season is just around the corner.  Sometimes it's just a simple little gift that can make someone's day.   Here's an idea for how to  make a custom note card holder.   Yes, I said custom.  You can make any size you want, any color you want, and decorate it to your tastes (or to the liking of the gift recipient.  


I started with the notecards.   I decided that I was going to take a simple path and just use quarter sheets.    So that measures 4.25 x 5.5 inches.  And I decided to decorate my notecards with a simple motorcycle image that is running off of the side of the note.   


 No coloring.... just keeping it simple.   That stamp is gorgeous enough on it's own.


So now to the measurements and mechanics.    I drew up the design for my box.   I suggest you do the same as you'll use it as a reference during construction.   

The Base
I gave the base a 1/8 buffer so the note cards would fit snug, but with enough room to breathe.   My base is 5 5/8 and 4 3/8.   To recap on the measurement of the base (or center of the sketch below).  My note cards are 5 1/2 x 4 1/4 inches.  Adding 1/8 inch to each side, I get the 5 5/8 and 4 3/8.  

The Sides
I wanted the sides to be 1 inch tall.   Tip:  pick an easy increment that is on your scoreboard.   The side panels will fold up, over, and then back into the base.   That's three sections that will each need to be 1 inch tall.   The first section will need tabs to fold under the side walls.   

Size of paper to cut.   
Adding my base and then the sides together, I get an overall size of 10 3/8 x 11 5/8.   Whew, that's just a bit smaller than a 12x12 sheet and I didn't need to reconfigure the size at all.    


I used a sturdy piece of Bazzell cardstock for my construction material.  I cut it 10 3/8 x 11 5/8 as per my calculations above.  


I had chosen do do 1 inch sides, so I scored three lines onto each side in 1 inch increments.  This s where it helps to have an easy measurement for the sides that works well for your scoreboard. 


Before trimming, I pre-crease all of my sides.    Keep in mind how these flaps will be folded and go ahead and crease them in that direction.  It's almost a zigzag as you crease them, as the walls of the box go up and one section folds back down into the base. 


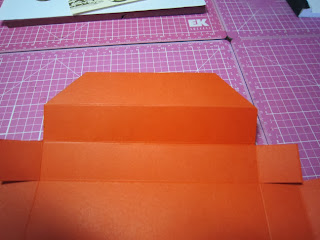
Now to the trimming.   Pay attention here.    You still need a flap that will fold into the adjoining side to actually make a box.   So be careful as to what you trim away.  I've marked out one corner for you below with Xs in the squares that get trimmed off. 


And then for that last square in the corner, you just cut one side in as shown below.   


Here's another shot below with all four corners trimmed and the flaps for bonding the adjoining walls trimmed. 


Now that outer section of each wall will fold back into the base.  In order to avoid unnessary bulk, I mitered each corner at 45%.  Be careful to only do the outer section. 


And here's a sample picture of one trimmed section.


Now compare the trimmed cardstock to the sketc.   See how the mitered sectiosn come into play and again, pay attention to those flaps to hold the adjoining walls together. 


I like to cut a piece of chipboard to reinforce my base.  I cut the chipboard just shy of the base dimension so that it wouldn't interfere with folding.... 


Be sure to do a dry fit before adhering the chipboard down.    That way you can trim off a smidge easily.


Time for construction.   


Do three of the walls first and hold off on the last short wall.  Hopefully you trimmed your flaps in a direction to where they fold into the short walls.  


Dry fold that last wall, but keep it flat.   Mark the center of the last wall.


Use a punch to create a notch.


Adhere that last wall into place and you have your custom sized note card holder. 


Add your notecards.   Feel free to decorate further and maybe even add a ribbon across the top of the notecard holder.   


I chose to keep it simple and here's my finished product.  I did purposefully go with orange and black for a Harley Davidson feel.


Related Posts Plugin for WordPress, Blogger...