Showing posts with label Bling. Show all posts

Tuesday, July 2, 2013

Patriotic Muscle Car

Bombshell Stamps' Miss July, Michelle Giraud issued a challenge to get patriotic with red white and blue.  I combined that challenge with this week's Mojo Monday sketch (mojo300).   Here's the end result featuring the Vintage Raceway set from Bombshell Stamps.


I used a couple of star punches to add a tone on tone 3D effect on the background layer.   The below angled shot shows this a bit better. 


Love SU dimensionals.  They're so easy to use.  I also love that they are half as thick as some of the pop dots at the big box stores.   Because they're thinner I can add two layers to a card. The circle is mounted with dimensionals and so is the car.   The car has single layer dimensionals on the front which is mounted on top of the raised circle.  The back has two layers of dimensionls to raise the piece to an even level.   


Lastly, the inside of the car.  I just added some strips of paper turned into banners.   Great use for scraps. 


Here's the Mojo Monday sketch for this week - mojo300


Supplies: 
Ink: Tuxedo Black (Memento)
Coloring: markers (Copic)
Printed Paper: On the Bright Side (My Mind's Eye)
Cardstock: Riding Hood Red, Crumb Cake, Whisper White (Stampin' Up); white (Neenah)
Tools: star punches (Creative Memories and Marvy); border punch (EK Success)
Accessories: Star bling (unknown - purchased at Michael's)


Wednesday, June 5, 2013

Butterfly Bombshell

This is for the Bombshell Stamps June sketch challenge.


 I adapted the sketch a bit by elongating the primary shape so that it would be more in proportion with that tall gorgeous Bombshell.   I also flipped the sketch so the line of elements is on top.  I used butterflies for that.   Instead of just adding some bling to one corner, I decided that every corner needed a little something. 


 Here's an angled shot to show some of the dimension.   I cut two of the spell binder shape -one print and one solid.  That solid piece is then cut into four pieces and aligned behind the printed piece to create a shaddow.


And the inside of the card.   


Supplies:
Stamps: Bombshell (Butterfly Queen)
Ink: Memento (Rich Cocoa), Ranger Distress Inks
Coloring: Copic
Printed Paper: Theresa Collins (Fabrications Canvas)
Cardstock: Stampin' Up
Tools: Spellbinders
Accents: Black Pearls, Nailhead brad sticker (inside of card)

Wednesday, March 13, 2013

Twinchie - Wall Butterflies

Here's my last Twinchie/Trinchie for JenniferD's swap on Scrapshare.com.   It's almost sad that I'm done with this swap as these little works of art were so much fun to create.    One of the challenges that Jennifer gave us for all of our sets was to use three embellishments.   I took her literally on this one.   I used papers from My Mind's Eye Miss Caroline - Dolled Up 6x6 pack.  One of the prints in that pack is of butterflies all lined up.  I took inspiration from that print.  Each butterfly is dressed up a bit differently - pearls flocking, glitter, microbeads, and rhinestoes.   


I used one of Martha Stewart's butterfly punches.   For the flocking and glitter, I ran the butterflies through my Xyron both face up and face down.   For the microbeads, I punched butterflies out of sheets of Terrifically Tacky tape.  The pearls and the rhinestones were the easy part.    :-)   


Here they are piled up before packaging and mailing.   

Tuesday, December 11, 2012

Snowflake Ornament Card

I made these cards using some ornaments I picked up during close out at Hobby Lobby last year.  While they're cute, they're still a bit too thick to make into a card.  I built a shadow box window using the ornament punch from SU and mounted the little ornaments inside of it. 


Also a lesson learned for glittery paper.  It's hard to stick stuff to it.  I had to go back and re-do the card by adhering assembly with the ornament down using Score Tape.  That back layer is gorgeous, but the glitter is hard to work with. 


 Here's another version.


And a bit of an angled view so you can see the dimension and shadow box that frames the ornament.


Supplies: 
Paper: My Mind's Eye, Core'dinations Pearls (red and silver)
Accessories: Ribbon, Bling, Ornaments from Hobby Lobby
Tools: EK Success (corner punch), Stampin' Up (ornament punch)

Sunday, April 8, 2012

Tag: Wonderfully Wonky Birthday Cake

This is for a swap on Scrapshare.  The group is to make 7 and I chose a birthday theme.   I started with this great cake die from Quickutz and it reminded me of some of Tim Burton's movies.  I used that as inspiration for the background.   I created the frame using Make the Cut (MTC) software and cut it with my KNK Zing.  This one took me a while to get done, but I love the results.  


The printed papers are from Basic Grey's Green at Heart collection.  The cake stand is made out of this glossy pearl paper that I picked up at the art department.  The black cardstock is by American Crafts.  Every single colored piece is inked with Tim Holtz / Ranger Distress Inks.  It's very subtle inking but just enough shading to give the pieces some dimension and life.


I used a lot of bling and glitter on these.  The Quickutz die has a lot of voids in great patterns.  I took advantage of those voids and either added bling or glitter.   The glittered is applied by running a backing paper through the Xyron face up and then applying very fine craft glitter. 


Here's the entire grouping.   I love this look.  I made 7 for the swap and a few extra for cards. 


The swap called for the back to be finished too.   I used a 6x6 background stamp by Impression Obsession on the back of the scrap piece from cutting the green frame on the front of the tag.   I stamped using Stampin Up's Lucky Limeade Classic Ink and sponged the outsides with the same ink. 


I couldn't resist this shot as I finally compiled all the birthday cakes.  

Thursday, March 29, 2012

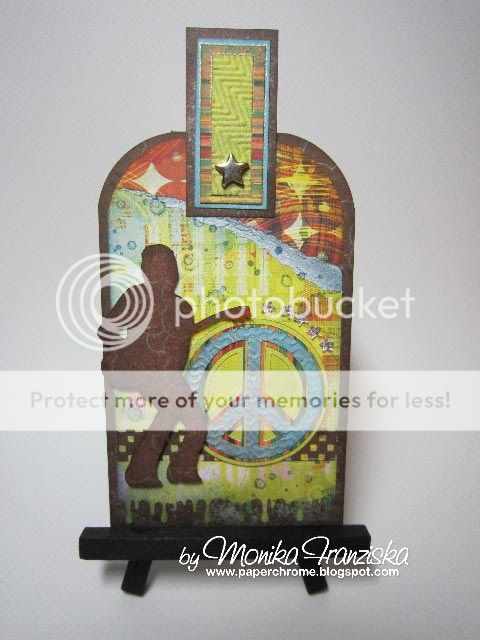
Tag: Peaceful Rock

I probably should have known better, but I signed up for another swap on Scrapshare.   Well, I can't really complain.   I love the inspiration I get from these swaps to create something a bit different and that I normally might not put together.   This swap is for large tags with embellishments and layers. 

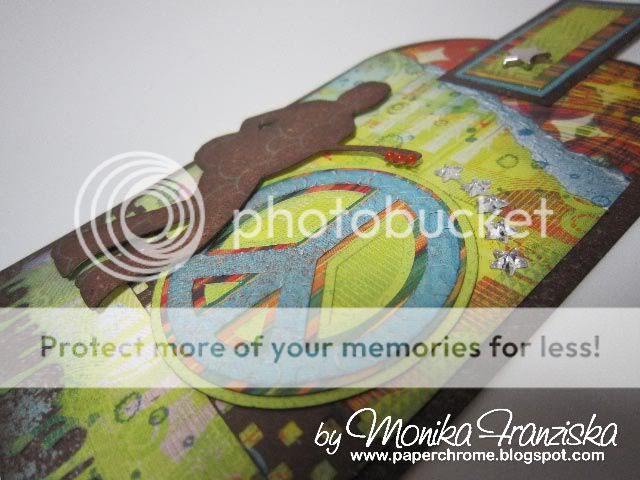
I pulled out quite a few supplies on this one.   You can see more of the detail with the close up below.  


Supplies: 
Paper: Basic Grey (Obscure)
Tools: Martha Stewart (Border Punches for both the drips at the bottom of the tag, but also the checker board strip), Fiskars corner rounder scissors, Make the Cut software to trace and create the rocker and the peace symbol with two shadow layers, KNK Zing to cut the rocker and peace symbol, Quickutz embossing folders (for the top layer of the peace symbol and the top of the tag), Fiskars corner rounder scissors
Inks: Ranger/Tim Holtz Distress Ink (stamping and I shaded every single piece on this tag)
Stamps: Stampin Up (ink splatters from French Foliage set)
Accents: Star brad - I think by Paper Studio, Star shaped bling, little orange pearl bling.
Other: Stampin Up Dimensionals to pop up the guitar player, paper tearing

Thursday, February 23, 2012

Swap Set: Purple Pretties

This is another swapset for JenniferD's swap on Scrapshare.  The swap is for scrapbook page elements.  The theme for this group is purple.  Purple isn't one of the easiest groups for me to work with, but it's my daughter's favorite color, so I searched my stash and stretched my creativity.   Here's what I came up with.   


The paper is by Basic Grey (Green at Heart collection).  The border is made with an EK Success border punch.  It's one of the newer releases that I've seen hit the stores and just couldn't resist the swirl.  I'm a sucker for swirls.   I mounted the punched layer of purple on top of a printed strip the same witth and then added a green border.   The little flowers are made using a Martha Steward punch.  Lastly, I added some bling to the center of the flowers. 

The butterfly is made with a two layer 4x4 Quickutz die set.   I ran the bottom layer through a xyron machine with the print side down to apply the adhesive to the print side.  I then added the detailed cut top layer and topped off the butterfly with some tinsel glitter.  The tinsel glitter stuck to any of the openings in the butterfly where the bottom adhesive layer showed through.  I've used this technique for applying fine art glitter occasionally throughout the years and it holds up well.   If you look back at some of the Christmas cards I made, there are some tags where I used the same technique.   Oh and I almost forgot about the body of the butterfly. That's cut with yet another piece of paper.  This time an orange print/solid from the pack.  I then colored the body using some Copic markers.  

Last but not least, the medallion is cut with a Spellbinder die.  The die is quite intricate and I ran it through my machine two or three times to make sure I had a good cut.   The flowers are Prima flowers.  The brad is a Build-A-Brad by Stampin' up and I used a 1/2 inch circle punch out from another print in that same Basic Grey set.  

Thursday, January 5, 2012

Bombshell Hugs & Kisses (MOJO222)


I had a great time making this card.   A lot of different elements went into it.   I may end up using it as my hubby's Valentine's Day card.  


The gal on this card is a stamp from Bombshell stamps, stamped with Rich Cocoa Memento ink and colored using Copic markers.   The dress she has on was made with a cutting file that I also purchased at Bombshell stamps and I cut it using my KNK Zing and Make the Cut software.   Speaking of my cutter and software, I designed/created the medallion (Spellbinder like) cutting file in the background.   I love having the multiple shadow layers.

The circular/medallion stamp is from an acrylic stamp set from Inkadinkadoo that I picked up ages ago.  I cut part of the circular stamped image off to make it fit in the medallion cut out. For the greeting I used an acrylic stamp from Fiskars' Lasting Love set.  I stamped it using Stampin' Up Craft ink (Chocolate Chip) and topped it off with clear embossing powder.   Three of the four corners were trimmed with a Fiskars corner punch.

The hearts were punched with several punches including Fiskars, Creative Memories, and EK Success.   I used a Cuttlebug embossing folder on the red piece of paper in the back ground.   Additional accessories include adhesive red pearls from Paper Studio and Stampin' Up ribbon.  Throughout the project, I used Ranger/Tim Holtz Distress inks for subtle shading.   The printed designer paper is by My Mind's Eye (Lost and Found - Madison Avenue).  The card base is made from a piece of 12 x 6 Bazzill cardstock and misc cardstock was used on the card, most likely from Hobby Lobby. Stampin' Up dimensionals were added to pop some of the images off of the page.


Friday, December 16, 2011

Oh Deary Deer

If you've been checking in on my blog, then this paper set looks familiar to you.  I put it to use with a few card designs this year.  I really love the red cream and black color scheme.  it's just classic and very rich.   And with any luck, you might not be bored of this paper pack just yet.   


Supplies:
Stamp: Stampabilities
Ink: Gold pigment ink, Colorbox liquid chalk
Paper: Paper Studio
Tools: Spellbinders, Quickutz
Accents: Ribbon, Gold bling stickers
Misc.: Gold embossing powder.

Sunday, December 11, 2011

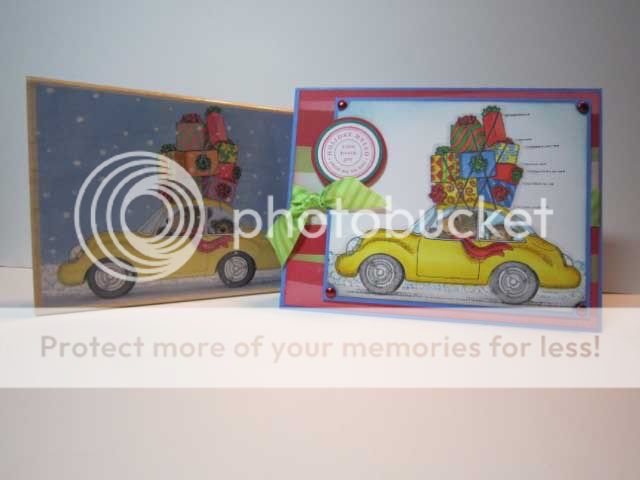
Beary Big Delivery


My little girl loves the House Mouse stamps and these bears were just irresistible.   It doesn't help that my first car was a yellow VW Super Beetle.  

Supplies:
Stamps: Stampabilities (Berry Big Delivery), Stampin Up (Circle of Friendship)
Ink/Coloring: Memento Tuxedo Black, Stampin Up Riding Hood Red, Copic markers
Paper: K&Company, Stampin Up Cardstock
Tools: Stampin Up Punches, EK Success Punches, Creative Memories Punches
Accessories: Ribbon, Bling stickers from JoAnn's

Saturday, December 10, 2011

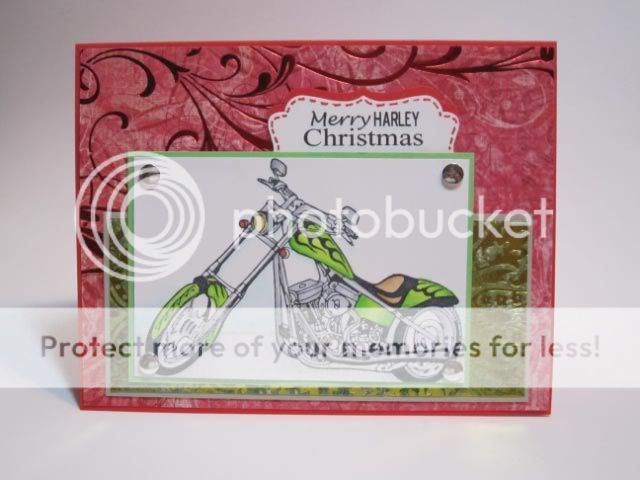
Merry Harley Christmas


This card was made with a couple of specific friends in mind.   I hope they enjoy it when they get it in the mail this holiday.

This card is also in response to a sketch challenge my friend Joanie posted on her blog.  If you have a few minutes, click the hyperlink and visit her blog.  She does an amazing job.

Here's the sketch that Joanie posted on her blog.  I went with my own colors for this one though since I had already colored the Harley this acid green. :-). 


Suppliers: 
Stamps: Bombshell (Custom Choppers)
Ink/Coloring: Memento Tuxedo Black, Copic markers, Stampin Up markers
Paper: K&Company, Stampin Up Cardstock
Tools: Stampin Up Decorative Label punch
Accessories: Bling stickers from JoAnn's
Other: Greeting is created with Inkscape and printed on my printer

Related Posts Plugin for WordPress, Blogger...