Showing posts with label Tags. Show all posts

Wednesday, April 3, 2013

Racing Blues

This is for April's Bombshell Stamps Pin-Up challenge.   This month's pin up, Theresa Abajo, challenged us to make a monochromatic card.  I used Bombshell Stamps Vintage Raceway stamp set, colored it with Copics, and then decided to hunt down a printed paper to match.  One of these days, I'm going to have to pull out the paper before I color.


Supplies: 
Stamps: Bombshell Stamps (Vintage Raceway)
Ink: Memento (Tuxedo Black)
Coloring: Copics, Sakura (Stardust Clear Gel)
Paper: Stampin' Up
Cardstock: Stampin' Up (Brilliant Blue, Night of Navy)
Accents: misc ribbon
Tools: Martha Steward (large corner rounder)

Featured Stamp Set: Bombshell Stamps (Vintage Raceway) 


Sunday, June 17, 2012

Vintage Bombshell Tag

This is my last tag for a tag swap that I joined on Scrapshare.  The theme for this group is Vintage.   I couldn't resist using my Bombshell stamps.


The Bombshell gal is stamped using the Bombshell Angel from Bombshell Stamps and dressed using the coordinating cutting file.  I cut the clothing using Make the Cut software and my KNK Zing.   I used primarily Copic markers for the coloring.   The shoes have some Spica markers on them and I added touches of shimmer here and there using a gel pen.   The Vintage Harley in the background is also from Bombshell Stamps (Vintage Motorcycle) and is colored with my Copic markers.   Both images are stamped using Rich Cocoa Memento Ink. The star is stamped using Stampin Up ink and Close to My Heart stamps (Wishing Star).  It's cut out by hand and mounted on a couple of circles where I added a smidge of shading with SU inks.


The paper used for stamping the motorcycle and the gal is Neenah.  The star accent is made using Stampin' Up cardstock and Stampin' Up Dimensionals. The background print is by Graphics 45 and is slightly shaded using Stampin Up ink on the outside.  The shirt is also cut from a Graphic's 45 print and shaded using Copics.   The hot pants are cut from Stampin' Up River Rock cardstock and colored with Copics to match the Harley in the background. Lastly, a bit of adhesive red pearls, some ribbon and a mini clothes pin finish up the tag. 


 Here's a shot at an angle that shows some of the dimension. 

Saturday, June 16, 2012

Mickey Shaker Tag

I signed up for a tag swap on Scrapshare.com a few weeks back and have two more groups to finish up.   This is for one of those and the theme is Generic Disney.   I didn't want to do another paper piecing though they're awesome and really wanted something different.  So I came up with a shaker box.  


 In between the layers of cardstock and acetate are Mickey head shaped glitter that we saved from when we were at Disney two years ago, micro beads, and some rhinestones.


Here's a group shot of the tags for the swap.  You can really see the contents of the shaker tag in this image. 


I created a cutting file using MTC (Make the Cut).  I traced Mickey, created a tag with a window opeining, welded them together and also created the other frames and tags using MTC.   I cut everything using my KNK Zing.   The layers from top to bottom are:
  1. Black Mickey silhouette cut out of AC cardstock, 
  2. heavy acetate, 
  3. gold frame cut from Shimmers DCWV cardstock, 
  4. Scotch foam adhesive around the outside of the tag opening,
  5. a second black Mickey silhouette cut of AC cardstock,
  6. a tag cut from printed paper by Recollections, and
  7. red background layer tag cut from Shimmers DCWV cardstock .
Score adhesive was great for layering these items.  I had to get a solid bond of adhesive at every layer to keep the little micro beads from escaping.   I also used some Kukuyo dotto adhesive (remaining stash) and Zig adhesive pen (on Mickey's tail).  Lastly some ribbon that I picked up ages ago. 


Tuesday, April 24, 2012

Vintage Harley - MOJO238


I can't believe I finally managed to do another MOJO Monday card sketch.  With as busy as life gets for this working Mom, this seems to happen once in a blue moon.  I do want to take the time to do sketch and color challenges more frequently.  They're really fun.   Here's the card I came up with the MOJO238 sketch. 


A lot was involved in this card.  I was determined to make a masculine card and use embossed metal.   I picked up some Quickutz metal sheets that have an adhesive layer on the back.  I ran it through a Cuttlebug embossing folder and inked it up using Tim Holtz/Ranger Alcohol Inks and Versa Magic Liquid Chalk.   I rubbed some of the extra off of the raised portion using some Alcohol Blending Solution (Tim Holtz/Ranger product) and a simple white eraser.

The alternating squares (or circles rather) were made using several punches and Stampin' Up Cardstock.   I used Creative Memories star punches, a Creative Memories circle punch, and a 1 1/8" EK Success circle punch.  I added a little subtle shading to the yellow Cajun Craze (retired SU color) stars and the Always Artichoke green circles using Stampin' Up dye ink and those wonderful artist sponges that Stampin' Up also sells.


The accent image is stamped using this great vintage motorcycle stamp by Bombshell Stamps and colored with Copics.  I stamped using Tuxedo Black Mememto Ink.  The orange shading on the circle is done with Dusty Durango SU dye ink (retired color).  I added additional circles of Night of Navy cardstock and a silver circle cut out of the same metal I used for the squares.   The tags were cut using an original Sizzix die.  The brad is by Karen Foster.  The ribbon, card base, and greeting stamps are all Stampin' Up. 

Here's the cards sketch from MOJO Monday - Sketch MOJO238

Sunday, April 8, 2012

Tag: Wonderfully Wonky Birthday Cake

This is for a swap on Scrapshare.  The group is to make 7 and I chose a birthday theme.   I started with this great cake die from Quickutz and it reminded me of some of Tim Burton's movies.  I used that as inspiration for the background.   I created the frame using Make the Cut (MTC) software and cut it with my KNK Zing.  This one took me a while to get done, but I love the results.  


The printed papers are from Basic Grey's Green at Heart collection.  The cake stand is made out of this glossy pearl paper that I picked up at the art department.  The black cardstock is by American Crafts.  Every single colored piece is inked with Tim Holtz / Ranger Distress Inks.  It's very subtle inking but just enough shading to give the pieces some dimension and life.


I used a lot of bling and glitter on these.  The Quickutz die has a lot of voids in great patterns.  I took advantage of those voids and either added bling or glitter.   The glittered is applied by running a backing paper through the Xyron face up and then applying very fine craft glitter. 


Here's the entire grouping.   I love this look.  I made 7 for the swap and a few extra for cards. 


The swap called for the back to be finished too.   I used a 6x6 background stamp by Impression Obsession on the back of the scrap piece from cutting the green frame on the front of the tag.   I stamped using Stampin Up's Lucky Limeade Classic Ink and sponged the outsides with the same ink. 


I couldn't resist this shot as I finally compiled all the birthday cakes.  

Sunday, April 1, 2012

Love Tag


This is another tag for a swap hosted by JenniferD on Scrapshare.   The swap is for a single embellished large tag.   The theme for this group was to add a quote or sentiment.   I wanted to do a white on white tag and found a great stamp for it.

The stamp is a clear stamp by Fiskars.  I used Memento ink.  the papers are Very Vanilla and Close to Cocoa by Stampin up and some beige shimmer paper that I picked up in the art department at the craft store.   Dies used include Spellbinders and Quickuts for the swirls.   The accents include Ribbon by Stampin' Up, Prima flowers, Stampin' Up brads, and pearl accents.  Lastly, I used a Tim Hotz/Sizzix embossing folder for the textured back ground.


Here are a couple of close ups of the tag that show the dimension.   Behind each shape cut there is a close to cocoa layer popped up with Stampin' Up Dimensionals.   It looks like a shaddow in the picture, but if you look closely you can see the bottom layer is actually another layer of cardstock.   The ribbon is sandwiched between the embossed vanilla layer and the cocoa backing layer.


The swap group is a "make four".   Each tag turned out a bit different.   Here they all are.


And here's a close up of all four tags.  You can see the cocoa backing layer a bit better in this shot.


Monday, December 12, 2011

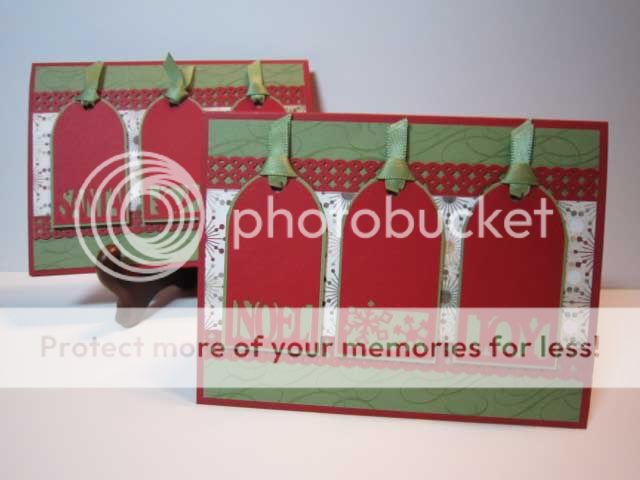
Tripple Tag Card


These little tags were cut with my WishBlade ages ago.  I had the tucked away in a binder with various bits that I pulled out this year and put to use.   I hand cut the shadow frames on the tags.  The green background paper is stamped tone on tone with some swirls.  The border is made with an EKSucess punch and the printed paper is Basic Grey.   

Supplies: 
Paper: Basic Grey, Misc Cardstock
Stamps: Basic Grey
Ink: Stampin Up Classic Ink
Tools: EK Success border punch, Hole punch, WishBlade (electronic cutter)
Accessories: Misc Ribbon

Related Posts Plugin for WordPress, Blogger...