Showing posts with label KNK Zing. Show all posts

Wednesday, February 12, 2014

Bombshell Valentine

This card is for this month's Bombshell Sketch on the Bombshell Stamps Blog.   With Valentine's day around the corner, I pulled out a classic.  She's the Bombshell Angel  wearing a gorgeous red polka dot dress cut using the Bombshell Angel Clothing Die Cut File


The printed paper is from MME's Lost and Found collection and the cardstock is from Stampin' Up.   The little circles on the front of the card are punched using a 1/2 inch EK Success Circle punch and topped with acrylic dome stickers from Stampin' Up from one of the Build-A-Brad kits. 


The Bombshell Angel is stamped on Neenah white cardstock using Memento ink (rich cocoa) and then colored with Copics.  The dress is cut using Make the Cut software and my KNK Zing e-cutter.   It's then carefully shaded using a bit of Tim Holtz/Ranger Distress Ink. 


The inside of the card is simple with a subtle print, some shading, and more of those punched circles.  


And here is Bombshell Stamp's February Sketch. Link your creation using this sketch to the Bombshell Stamp's blog for a chance to win a free stamp set. 


Wednesday, September 11, 2013

Silently Cute

This little card speaks volumes without saying anything.  I just love how simple it is and how fun it turned out.   I was going to add more to it, but it just didn't seem to need more.   

What prompted this card is that I've been seeing a lot of paper ribbons online.  So I decided to create my own cutting file with Make the Cut software and I cut it out with my KNK zing.   Love that cute little polka dotted bow.  Then I had a scrap of embossed paper laying around.  Added some layers, printed cardstock and a touch of orange.   Googlie eyes gave this little guy life and voila.


Supplies:
Printed paper: My Mind's Eye
Cardstock: Stampin' Up
Tools: embossing folder (Stampin' Up); software (Make the Cut), e-cutter (KNK Zing)
Accessories: googlie eyes. 

Friday, July 5, 2013

Bombshell Glam


This is for the July Bombshell Sketch challenge.   I tried repeating the same scalloped circle, but it just didn't do it for me, so I used an alternate shape for the center image.   


 The rose ribbon trim is dusted with a bit of Ranger Distress ink using an artist sponge. 
Her dress is cut using MTC and my KNK Zing.  I cut one of the dresses from Bombshell Stamp's Bombshell Clothing file. 


When I saw the sketch, I saw it as a perfect opportunity to do a bit of a fancy fold


And here's the inside of the card.


Supplies:
Stamps: Bombshell Stamps (Bombshell Angel)
Ink: Memento (Rich Cocoa), Ranger Distress Ink
Coloring: Copic, Spica
Printed Paper: Stampin' Up (Pocketful of Posies)
Cardstock: Stampin' Up (Night of Navy), Core'dinations Pearls (Silver Shimmer)
Tools: Spellbinders, Martha Stewart (border punch), Make the Cut software, KNK Zing e-cutter
Accents: Stampin' Up (flower trim), Rhinestones


Sunday, May 19, 2013

Cool Skate

Is the summer here yet?   Is spring soccer over yet?   Will work ever let up?    At least I managed to squeeze in a bit of an escape with this card.  I think it's perfect for a teen or tween boy.  The skate boarder image is straced using MTC and cut with my KNK Zing.  I then covered it with a coat of Glossy Accents by Ranger. The background has some silver shimmer paper trimmed with a Martha Sttewart border punch.  


Thursday, May 2, 2013

Bombshell Paper Dress-Up


This tutorial is also posted on the Bombshell Stamps blog.  
_____________________________

Hi there Bombshell fans.   As a Bombshell fan, one of the must have stamp sets, is the Bombshell Angel.   And Bombshell has done a fabulous job making her oh so versatile.   One of the offerings is a cutting file you can purchase to make Bombshell clothing.   That Bombshell Angel makes for one H.O.T. dress-up doll.  If you have an e-cutter that hooks up to your computer such as a KNK Zing, Black Cat, Cameo, Silhouette, etc., then this is just oh so perfect for you.  It's oh so easy for you to dress your Bombshell.   I'll take you through the process step by step.  


This image below gives you an idea of all of the clothing items that are available and it's on sale right now for only $8.99.   You'll get several different file formats to suit your machine including .scut, .gsd, .gif, and .eps.  For more details read here:  "Bombshell Clothing" Die Cut Collection


Now follow me along on how I make use of this awesome file.  I like to use Make the Cut (MTC) software and my KNK Zing.   I love MTC.  It's so easy to use.  I imported the .scut version of the cutting file and was ready to start cutting in no time.   


After purchasing the cutting file from http://www.bombshellstamps.com, you can access the download from the home page.  Click on the link "DIGI PICKUP" toward the top right of the page.   


Log in and you should be able to access your purchased files.  Follow the download instructions at the top of the page.... it's pretty simple. 


Be sure to save your files where you'll remember later. 


Open your software for your e-cutter.  In my case, I'm using Make the Cut (MTC).  MTC easily lets me import non .mtc file formats.   So I'll chose the .scut file and import it into MTC.  The import process takes barely a few seconds...  It's just a few mouse clicks. 


Once imported, I can save the file as a .mtc file and massage the file as desired.  For example, I split the file up and put each clothing item on its own layer.  One thing I was careful not to do is that I did NOT resize any of the items.  The items are perfectly sized to work with the Bombshell Angel stamp set. 


So now to the cutting process.  Load your paper onto your cutting mat.  I chose a blue jean print to cut... well, you guessed it - blue jeans.  :-)   


Load your cutting mat, go back to your software and give the instruction to cut. 


Remove excess paper and weed any small items from your cut item.  See.... I now have little paper blue jeans.   Aren't they cute? 


Do the same for additional articles of clothing.  I chose to cut a red polka dot shirt.


I like to add a bit of shading.  It not only gives the Bombshell clothes some dimension, but it also does a great job to disguise any burrs from the cutting process.


Here's her outfit with shading and ready to go.


Now to stamp a Bombshell Angel.   I like to stamp her in Rich Cocoa Memento ink.  I think black is just a bit harsh for her skin and Memento ink works well with my Copic markers.


After stamping, I just lay the outfit on my Bombshell image to see where I need to color.   See how low that belt goes.   I'm just going to color dark brown behind the jeans for the belt.


Here she is again after coloring.  I just laid the clothes on her again to make sure I got everything before fussy cutting her out and then adhering the clothes.


And WOW... What a Bombshell ready for a ride.   I'll be featuring her on a card sometime in the future, but in the mean time, she's just a hottie with my son's toy motorcycles. :-)


Hope you enjoyed this tutorial!


Tuesday, April 30, 2013

Simply Irresistible Angel


Sometimes life gets a little busy for this working mom.  So instead of starting off April with Bombshell Stamp's sketch of the month, I'm finishing it up with this awesome and versatile sketch.   This card is also posted on the Bombshell Stamps Blog.  If you like this sketch, Bombshell Stamps posts their sketch on the 5th of every month.  Oh and if you like the dress this Bombshell is wearing, stop by on May 3rd for a tutorial on how to create a fabulous Bombshell outfit with your e-cutter and favorite printed designer paper.


I often take liberties with sketches and use them as inspiration.  This time I stayed pretty true to the sketch.  Here it is if you didn't catch it earlier this month. 


Here's a bit of an angled shot that shows a bit of dimension.  I love pop dots and may need a 12 step program one of these days. Hmm... I could make steps with pop dots... anyway, back to the card. 


Here's the inside of the card. 


This card uses Bombshell's Bombshell Angel Stamp set


Additional Supplies: 
Ink: Rich Cocoa (Memento), Distress Ink for shading (Ranger/Tim Holtz)
Coloring: Copic Markers
Printed Paper: Miss Caroline 6x6 (My Mind's Eye), 
Cardstock: Basic Grey, Riding Hood Red, and Naturals White (Stampin' Up), Neenah white cardstock for the Bombshell.
Tools: e-cutter (KNK Zing), software (Make the Cut)
Accessories: Brads (Paper Studio),  Rub-on for the greeting (misc), Pop Dots, Ribbon (Stampin' Up)


Thursday, December 20, 2012

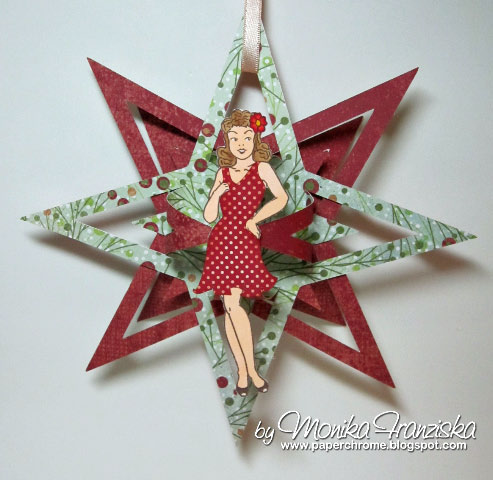
Bombshell Star Ornament - Tutorial


This month I'm the December Guest Designer, a.k.a. Pin-up for Bombshell Stamps.   As this month's guest designer, I got to come up with a challenge theme for December. Given the holidays, my challenge was to - Get Ornamental.  

For yesterday's Bombshell Pin-Up Challenge I made a star ornament featuring the Bombshell Stamped image from the Bombshell Angel and a star ornament cutting file I created.  Here's how I made it and I'd like to share the cutting files I made.  You'll also find this tutorial on the Bombshell Blog.


Cutting Files:  MTC or SVG


1. Cut two stars using the star ornament cutting file.  Link to file above.   I'll recommend a double sided print.  I used some Basic Grey (Fruitcake collection) and cut it using my KNK Zing.  I designed the star cutting file using Make the Cut software.


2.  Take one of the stars and fold up or rather curl up the four cut out points.


3. Punch out two 3/4 inch circles inch circles from scraps.   Apply some strong adhesive to one.  Score Tape works great.   And join all of the points onto the circle.   Note that I used a half inch circle to begin with, but it just didn't give me enough of a bonding surface and I then applied a larger circle later.


4. Apply adhesive to the other 3/4 inch circle and adhere to the top.  Set aside. 


5.  Take the second star.  I want the solid side visible.  So I'll fold the points to the print side as they'll be sticking out the back of the ornament for more 3D.   


6.  Fold up the cut out points with a hard crease.


7.  Flip the second star over and apply some strong adhesive to the center of the piece.  Score Tape or ATG adhesive work great.


8. Join the two stars.


9. Apply a stamped and cut out image to the front of the star.  The 3/4 inch circle is your mounting point.


10.  Apply a ribbon, string, or hanger to one off the star points and you're ready to decorate.


And here's the finished product.  Note that you can resize the cutting file and cut the stars any size you like.  


Related Posts Plugin for WordPress, Blogger...