Wednesday, September 25, 2013

Harley Anniversary


It's time for the September Bombshell Stamps Hump Day Hop.   The theme for this month's blog hop is Speed Demon - Master's of Transportation. Given that my hubby and I are both Harley Davidson enthusiasts, this is an easy challenge around this house.  In fact, this card was for my hubby for our anniversary.  

This card uses Bombshell Stamps' Harley Bikes set.   I stamped using black Stazon ink on water color paper.   I then used my new Tim Holtz Distress markers to color the bike and the background along with an aqua painter.   I admit, I need some more practice with those pens, but they're promising.  


The greeting is embossed with silver embossing powder.  The edges around the greeting is done with a direct to paper technique with versa mark and heat embossed with silver embossing powder.  

The base of the card is sliver metal that is embossed using a Tim Hotz embossing folder and colored with Tim Holtz embossing ink.   The final touch is a leather strap applied using Tim Holtz mini staples.   The card base is made with Stampin' Up cardstock.  


For more great projects using Bombshell Stamps follow the blog hop....  

Blog Roll


Monika: http://paperchrome.blogspot.com/ (you are here)

Friday, September 20, 2013

Tinted Metal Rivets

When the digital Rosie the Riveter image was released by Bombshell Stamps, this great embossing folder of Riveted Metal by Tim Holtz came to mind.  It goes perfectly with Rosie.   And what better material to emboss using that folder than metal.   Of course I had to distress it some with alcohol inks.  Here's how I did it.


Here's a picture of the supplies.  for the metal distressing.


I picked a sheet of purple metal to emboss.


I cut it to size and then ran the folder with the metal through my Sizzix.


Here's a shot of the embossed metal.


 To tint it, I used some Tim Hotz/Ranger alcohol inks.   I added a few drops of two different colors of alcohol inks onto my pad and applicator.


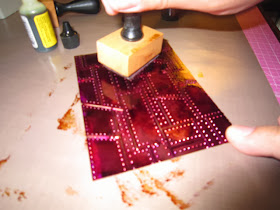
Then added some blending solution before applying the ink to the metal.


The blending solution took some of the purple tint off of this metal, but I was good with that.  It gave me the effect I was looking for.


You can clean up your teflon work mat with a bit of blending solution and a tissue.   I just squirt a bit of the blending solution on my mat and then wipe up. 


Oh and for grins, here's my storage container.  I made a couple of boxes and dividers out of packaging chipboard.  Works perfectly.


And the outside of the box.  Of course it has to have an alcohol ink finish to it if the box is going to hold alcohol inks.  Right?


I applied adhesive to it with my ATG gun and then applied the metal to a cardstock layer.  This gives the thin metal sheet more stability as I distress with a sanding block. 


Rubbing off the top layer of ink from the metal using a sanding block. 


Here's the finished and sanded metal.  Love the texture and depth.


I added Rosie to the metal and voila.  
Rosie's colored with my Copics.   


Wednesday, September 11, 2013

Silently Cute

This little card speaks volumes without saying anything.  I just love how simple it is and how fun it turned out.   I was going to add more to it, but it just didn't seem to need more.   

What prompted this card is that I've been seeing a lot of paper ribbons online.  So I decided to create my own cutting file with Make the Cut software and I cut it out with my KNK zing.   Love that cute little polka dotted bow.  Then I had a scrap of embossed paper laying around.  Added some layers, printed cardstock and a touch of orange.   Googlie eyes gave this little guy life and voila.


Supplies:
Printed paper: My Mind's Eye
Cardstock: Stampin' Up
Tools: embossing folder (Stampin' Up); software (Make the Cut), e-cutter (KNK Zing)
Accessories: googlie eyes. 

Monday, September 9, 2013

Delicate Garden Butterfly

Here's that Martha Stewart mold again.  I dusted the mold with some sparkly white glitter before filling it with white clay.   It gave it a nice white shimmer.  Perfect for a wedding, anniversary, or christening card. 


Supplies: 
Tools: mold and clay (Martha Stewart), embossing folders (Quikutz)
Cardstock: Hammermill, Stampin' Up
Accessories: fine white glitter; dimensional adhesive. 

Saturday, September 7, 2013

Butterfly Red

I'm really quite late posting this.  At the beginning of the Summer I saw these moulds and white clay from Martha Stewart hit the shelves.  I just had to try it out.  I mixed the clay with some red ink and made this gorgeous butterfly.   I then colored the clay with my Copics and some sparkly markers.   Gorgeous!


And a bit of an angle for a better view.


Supplies: 
Cardstock:  white cover stock (Hammermill); Real Red (Stampin' Up)
Tools: embossing tin (Spellbinders); mold & clay (Martha Stewart)
Coloring: dye ink, markers (Copic), sparkle pen (Sakura)
Accessories: dimensional adhesive. 


Thursday, September 5, 2013

Fashionable Butterflies

This is my card for Bombshell Stamp's September sketch challenge.


Here's an angled shot to show off some of the layers and dimension.


and the inside of the card. I made this card at a retreat and my friend sitting next to me had this perfectly matching Washi tape so I bummed a few strips for the inside. 


Supplies: 
Stamps: Butterfly Queen (Bombshell Stamps)
Ink: Tuxedo Black (Memento)
Coloring: markers (Copic)
Printed Paper: Carolina breeze (Theresa Collins)
Cardstock: So Saffron, Basic Grey (Stampin' Up), white (Hammermill)
Tools: dies (Spellbinders), corner rounder
Accessories: nail head stickers (JoAnn's); Washi tape (unknown), foam adhesvie


Tuesday, September 3, 2013

Devilish Layer Challenge


This month's Bombshell Stamps Pin Up, Jenn Cochran has issued a challenge to layer it up.   I took her up on her challenge and created the below card using the Cherry Bomb stampset from Bombshell Stamps.

Here are 5 layers piled on nice and neat...  a striped stamped card base, and embossed white layer, a tea mat, another background stamped layer and then that wicked devil from Bombshell Stamps' Cherry bomb set.


Here's a shot from the side and you can see the dimension.  Two sets of layers are adhered using some dimensional adhesive for eve more pop.  


Supplies: 
Stamps: Cherry Bomb (Bombshell Stamps), stiped background (Impression Obsession), Tin Pattern (Stampabilities)
Ink: Tuxedo Black (Memento): Cameo Coral & Bermuda Bay (Sttampin' Up)
Coloring: markers (Copic), markers (Stampin' Up)
Cardstock: Cameo Coral, Bermuda Bay, Whisper White (Stampin' Up)
Tools: Twirl embossing folder (Quickutz)
Accessories: red pearls, dimensional adhesive, ribbon (on the inside)