Sunday, March 31, 2013

Honey Bee Box

My Stampin' Up Demo, Chris Galbraith challenged her customers to get creative with this box she put in our orders a couple months back.   I missed the next stampin' class due to Soccer Mom duties, but brought in my little creation to show and tell this past class.   Here's what I made.  


Supplies: 
Stamps: Stampin' Up (Nature Walk)
Ink: Memento Ink (Tuxedo Black), Stampin' Up for shading. 
Coloring: Copic markers
Paper: Stampin' Up DSP (Botanical Gazette), Stampin' Up cardstock
Tools: Creative Memories (octagon shape maker), Stampin' Up embossing folder (Honeycomb), Tim Holtz/Sizzix Rosette Die
Accessories:  Hemp Twine


Wednesday, March 27, 2013

Valentine Texture

I posted my son's valentine's day cards last.   Here's what my daughter and I came up with for her Valentine's Day cards. 


Each card is made with an embossing folder and some stamped image, except for the glittery heart card that is on the right in the image below.   We stamped and punched several hearts, ran a piece of cardstock through the Xyron, adhered the hearts and covered the rest of the exposed adhesive with fine craft glitter. 


I used various embossing folders and embossing plates.   Some are from Stampin' Up, some from Sizzix, some from Cuttlebug, and some from Hobby Lobby (Paper Studio).


I also used several different SU punches including the heart punches, label, oval, scalloped, etc.  


These cards are a non-standard size, so I had to make custom envelopes.   Here's one of the cards with an envelope. 


I ended up using three different prints for the envelopes.  Cute!


And here they all are again lined up on my desk.  


Stamps: Stampin' Up (I {Heart} Hearts, You Are Loved, and Valentine Defined)
Ink: Stampin' Up
Cardstock: Hammermill White cover stock, Stampin' Up colored cardstock.
Tools: Stampin' Up Punches (Heart, Hearts, Decorative Label, Square, Scallop Square, Postage Stamp and Large Oval), Embossing Folders and Plates (Stampin' Up, Cuttlebug, Sizzix, Paper Studio)
Accessories: Glitter

Monday, March 25, 2013

Orange Valentine

See how behind I am in posting.   I made these for my son to give to his class for Valentine's Day.  His favorite color is orange and I just couldn't see why he shouldn't have orange valentines to hand out. 


Supplies: 
Cardstock: Stampin' Up (Crumb Cake & Dusty Durango)
Printed Paper: My Mind's Eye
Tools: EK Success heart punch
Stamps: Stampin' Up (Teeny Tiny Wishes)
Ink: Stampin' Up. 

Sunday, March 24, 2013

Spellbinder Organization - CD Binder

The struggle of organization.   It goes hand in hand with having a stash of creative supplies and tools.   I used to keep my Spellbinder and Framelit dies in these great magnetic folders.  They're great, but I started to outgrow them.   So I kept on racking my brain about other solutions.

A binder system would be great.  I even tried the xyron magnet sheets and turn them into binder pages, but those didn't have enough magnetic power.   So then the though of combining magnetic sheets with some kind of sleeve.  They're heavy though, so a standard scrapbook sleeve wouldn't be strong enough.   So I needed something built to handle a bit of weight, had a sleeve and could be a binder.   I suppose that old CD binder I had laying around was worth a try.   To top it off, the CD binder has a zipper closure.  Perfect.  That way if anything did come lose it would be trapped in the binder.


So now, after using this solution a couple of weeks, I'm very happy with it.   Here's how I made it.  I went to my local Lowes and purchased a couple packages of these Magnetic AC Vent covers.   They're perfect for cutting in your paper trimmer.


I cut the magnetic sheets to size and even rounded the corners using a Crop-A-Dile Corner Comper by We R Memory Keepers.   I then mounted one set of Spellbinder dies per square.    For larger sets, I cut longer magnetic sheets and make sure to tuck those larger sets into the bottom pocket.   


Wednesday, March 13, 2013

Twinchie - Wall Butterflies

Here's my last Twinchie/Trinchie for JenniferD's swap on Scrapshare.com.   It's almost sad that I'm done with this swap as these little works of art were so much fun to create.    One of the challenges that Jennifer gave us for all of our sets was to use three embellishments.   I took her literally on this one.   I used papers from My Mind's Eye Miss Caroline - Dolled Up 6x6 pack.  One of the prints in that pack is of butterflies all lined up.  I took inspiration from that print.  Each butterfly is dressed up a bit differently - pearls flocking, glitter, microbeads, and rhinestoes.   


I used one of Martha Stewart's butterfly punches.   For the flocking and glitter, I ran the butterflies through my Xyron both face up and face down.   For the microbeads, I punched butterflies out of sheets of Terrifically Tacky tape.  The pearls and the rhinestones were the easy part.    :-)   


Here they are piled up before packaging and mailing.   

Tuesday, March 12, 2013

Twinchie - Airplane Shaker


Another Trinchie Twinchie?   Yup.  This one is for the little boy group in JenniferD's swap on Scrapshare.com.  Instead of 2x2 twinchies, we're making 3x3 squares and I've been calling them trinchies.  


I used some Echo park paper, SU carstock, and a Quickutz die to create this shaker box.   The inside of the shaker box has mico beads.   The construction of the shadow box is a bit involved.   Here's how I made the front of the box.   I used some SU cardstock cut at 2 7/8 square and cut a square of pattern paper at 2 3/4 square.   Adhered those two together and used a slide paper trimmer to cut a square out of the middle.  I used a half an inch as my frame.  Then I adhered a 2 3/4 square piece of clear plastic to the back of the square.   For the base of the window, I used a 3x3 piece of cardstock and a pied of 2 3/4 square patterned paper.   Ad here those together and then use strips of foam tape to create a frame around the patterned paper.  make sure there are no gaps or those little micro beads will escape.   

I added an die cut airplane to the center of the shaker box.   The airplane is mounted on foame pop dots that are not quite as thick as the foam tape border.   Carefully pour in some microbeads.  I used clear as silver.   Then carefully peel off the top adhesive layer of the foam tape and apply the face of the shadow box.   Make sure the adhesive is adhered tightly and voila... you're done. 


Here are all four of the little boy airplane trinchies together.  You can see the effect of the shaker box.   And yes, I've sat and played with just the shaker box.   How could I not?

Twinchie - Love Tim Holtz

 How can you not love Tim Holtz?  He's so fun, friendly and incredibly talented.   I watched a number of his videos from this past CHA and found myself simply enjoying them.  Watching him create was a pleasure.  He really has a great personality to go along with his creative self.  

When I joined JenniferD's twinchie swap on Scrapshare.com, I just had to sign up for the Tim Hotz group.  Here's what I came up with. 


The background paper is from Tim Holtz.  It's then stamped with his sunburst stamp twice (once in each direction).   I further added some more stamping with the script.  I made sure to heat set the ink as I used Ranger Distress Ink for the stamping and sponge shading on the edges.   After the ink was set, I used some gold pigment ink and gold embossing powder along with yet another Tim stamp to create the gold wings. 

The heart itself is cut from Grungeboard using a Sizzix original die.  I painted it with white Ranger acrylic paint using those great little dauber bottles.  After it dried, I inked up the heart with some Distress Ink, sunk it in fine embossing powder and heat embossed.  While still hot, I dipped the heart into UTEE and hit it with the heat gun again.  I added about three layers of UTEE all together.   Once dry, I bent the heart a bit here and there to crack it for some additional distress effect. 


Here they are all lined up as they were ready to be packaged up and shipped to JenniferD.  The background cardstock is from Stampin' Up.

Monday, March 11, 2013

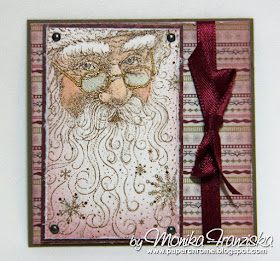
Twinchie - Vintage Christmas

OMG, I found the Blogger button again.   I really needed a break from blogging and am glad to be back at it.  I missed it.   I'll be posting a few of the things I've made over the past month.  Somehow I manage to still create some items, but just haven't made it to the blogosphere.  Now I could tell you about work picking, soccer season back in full swing, or about the surgery on my hand.   Eh...  I just took a break.  No excuses. Now it's time to get back to posting.

Have you ever heard of an inchie or a twinchie?  It's a small canvas on which to create something yummy.   Well, my friend JenniferD on Scrapshare.com is hosting a swap for Twinchies.  I think she should actually call it Tirnchies since we're doing 3x3 squares.  Here's the first of my items for this swap.


I just love this Santa image by Rubber Stampede.  I walked past it several times at Hobby Lobby until I finally just snagged it and put it into my cart.   This is my first project using this stamp and all I can say is OH WOW!  It stamped wonderfully.    I used Ranger/Tim Holtz distress ink to stamp it and then embossed it with very fine clear embossing powder.  It embossed wonderfully. Every little line and dot of that image is embossed.   The image is stamped on Stampin' Up Naturals White cardstock and colored with Copic markers.   I used s bit of Spica marker for the shimmer on the rim of Santa's glasses.   To finish off the stamped image, I sponge blended on some more color using Victorian Velvet Distress Ink and then distressed the edges.   As if that wasn't enough, these adorable little brads are holding the stamped image onto a background layer. 

All of the printed paper is by My Mind's Eye, Lost and Found Christmas collection.   The background layers are also have sponge blended with distressed edges.  I hit my ribbon stash for some miscellaneous satin ribbon.  Lastly everything is mounted on yet one more layer of Stampin' Up Soft Suede cardstock.   


Here are all four Santa's lined up.  Three of these are already on their way to JeniferD.  I held back my own copy.  


This photo is a tribute to the wandering creative mind.  I wrestled with a different gorgeous paper for a few days and just couldn't get the entire ideas together.  I even ended up smooshing some bottle caps and glazing the image with Glossy Accents medium by Ranger.   But I couldn't make it further.   So that Santa in the bottle cap and three more like it are now refrigerator magnets.